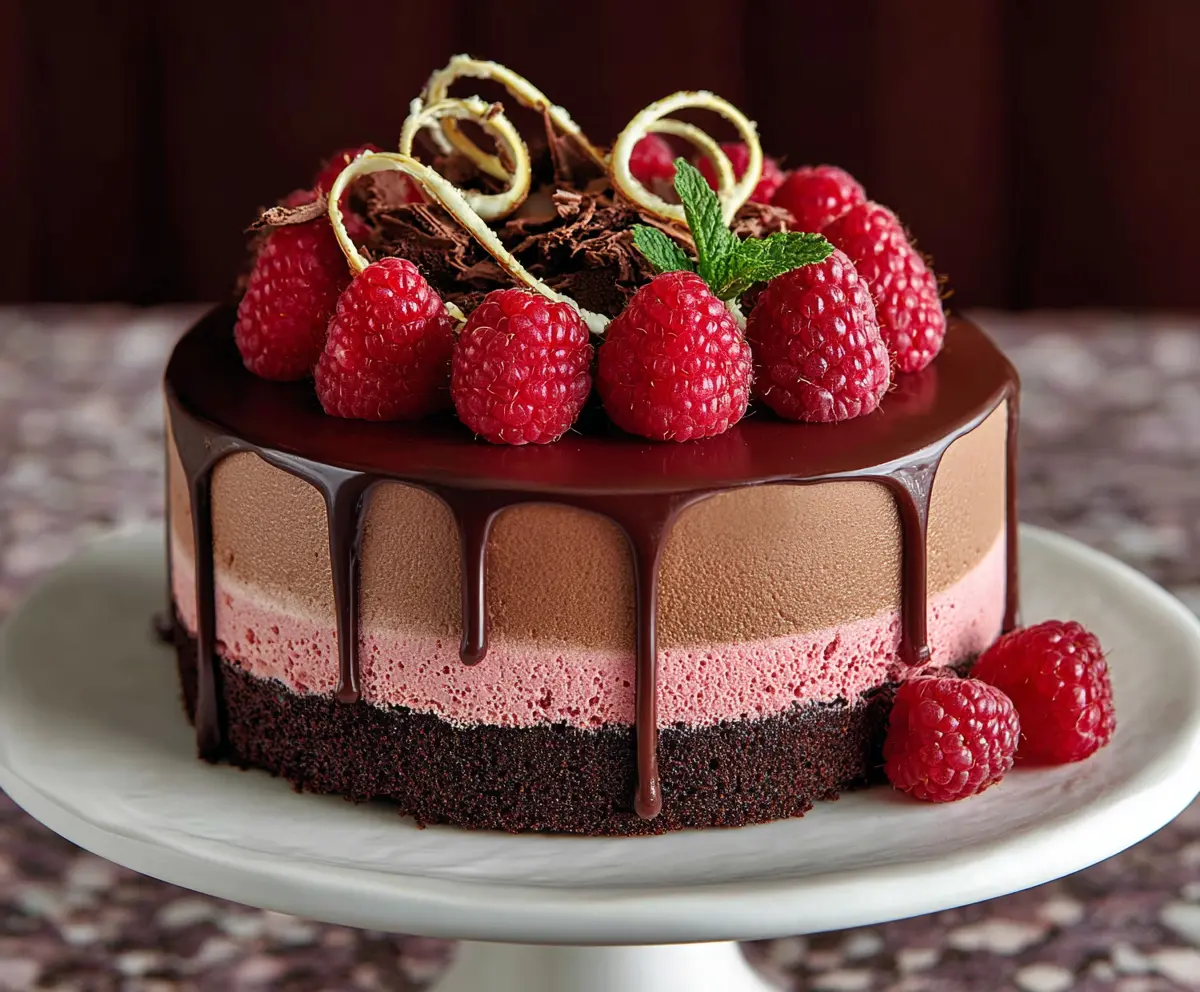
This Chocolate Raspberry Mousse Cake is a dreamy dessert that combines rich chocolate with fresh raspberries. It’s smooth, creamy, and oh-so-decadent!
Let’s be real, there’s something magical about the chocolate and raspberry combo. I love how the tart raspberries dance with the rich mousse. It’s a true delight that impresses everyone! 😊
This cake is super fun to make! Just whip up the mousse, layer it, and let it chill. You get to enjoy a slice that feels fancy but is quite easy to whip up at home!
Key Ingredients & Substitutions
All-Purpose Flour: A staple in baking for structure. If gluten-free, you can substitute with a gluten-free flour blend, ensuring it has xanthan gum for texture.
Cocoa Powder: Unsweetened cocoa gives the cake a rich chocolate flavor. You can use Dutch-processed cocoa for a smoother taste, though it will alter the color slightly.
Buttermilk: It adds moisture and acidity balancing the chocolate’s richness. If you don’t have it, you can mix 1/2 cup milk with 1/2 tablespoon vinegar or lemon juice and let it sit for 5 minutes.
Raspberries: Fresh raspberries are ideal for flavor, but frozen works too. Just make sure to thaw and drain excess water before using.
Heavy Cream: Essential for both mousse textures. If you’re looking for a lighter option, you could use whipped coconut cream, but the mousse might be less rich.
How Do You Get Perfectly Whipped Cream?
Whipping cream is all about temperature and patience! Keep your cream and mixing bowl chilled for best results. Here’s how to do it:
- Use cold heavy cream straight from the fridge. The colder, the better!
- In a chilled mixing bowl, begin whipping on medium speed.
- Once it thickens slightly, increase to high speed until soft peaks form. This means it should hold some shape but can still droop a bit.
- Be careful not to overwhip as it can turn grainy and might become butter!
What’s the Best Way to Assemble a Layered Cake?
Assembling this layered cake is key to achieving that gorgeous look!
- Make sure the chocolate cake is completely cooled to prevent melting the mousse layers.
- Use a clean springform pan to keep the shape tight while you layer. It helps to prevent mess!
- Pour each layer gently. Don’t rush it! Let each mousse set a bit before adding the next layer.
- Chill each layer in the fridge for at least 1 hour before adding the next. This helps maintain structure.
By considering these tips, you can create a beautiful Chocolate Raspberry Mousse Cake that’s sure to impress anyone who sees (and tastes!) it!
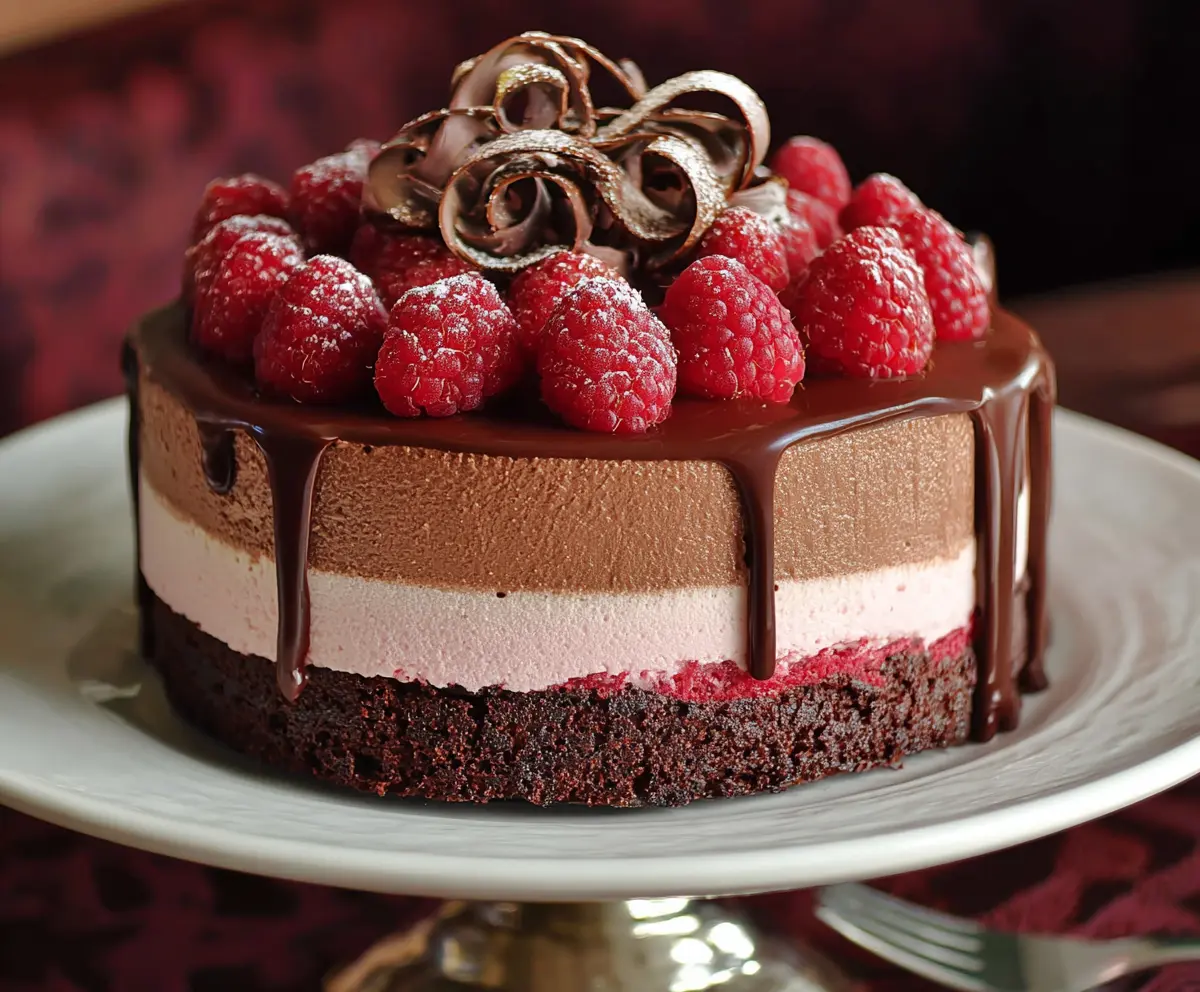
Chocolate Raspberry Mousse Cake
Ingredients You’ll Need:
For the Chocolate Cake Base:
- 1 cup all-purpose flour
- 1 cup granulated sugar
- 1/2 cup unsweetened cocoa powder
- 1 tsp baking powder
- 1/2 tsp baking soda
- 1/4 tsp salt
- 1/2 cup buttermilk, room temperature
- 1/2 cup vegetable oil
- 2 large eggs
- 1 tsp vanilla extract
- 1/2 cup boiling water or hot coffee
For the Raspberry Mousse:
- 1 1/2 cups fresh or frozen raspberries
- 1/4 cup granulated sugar
- 1 tbsp lemon juice
- 2 tsp powdered gelatin
- 1/4 cup cold water
- 1 cup heavy cream, chilled
For the Chocolate Mousse:
- 6 oz (170g) semisweet or bittersweet chocolate, finely chopped
- 1 tbsp powdered gelatin
- 1/4 cup cold water
- 1 1/4 cups heavy cream, chilled
For the Chocolate Ganache Glaze:
- 4 oz (115g) semisweet chocolate, finely chopped
- 1/2 cup heavy cream
For Decoration:
- Fresh raspberries (about 10-12)
- White and dark chocolate curls or shavings
- Fresh mint leaves (optional)
How Much Time Will You Need?
This delightful dessert requires about 20 minutes of prep time and 5 hours total chill time. Additionally, it’s best if left overnight, so plan for an overnight treat! The hands-on time adds up to roughly 1 hour, but the waiting (and anticipation) is well worth it!
Step-by-Step Instructions:
1. Make the Chocolate Cake Base:
Preheat your oven to 350°F (175°C) and grease and line an 8-inch springform pan with parchment paper. In a large mixing bowl, sift together the flour, sugar, cocoa powder, baking powder, baking soda, and salt. In another bowl, whisk together the buttermilk, vegetable oil, eggs, and vanilla extract. Gradually add the wet ingredients to the dry ingredients, stirring just until combined. Now slowly mix in the boiling water or hot coffee (be careful, the batter will be thin!). Pour the batter into your prepared pan and bake for 30-35 minutes, or until a toothpick inserted in the center comes out clean. Let the cake cool completely in the pan.
2. Prepare the Raspberry Mousse:
In a saucepan, combine the raspberries, sugar, and lemon juice. Cook over medium heat for about 5 minutes until the raspberries break down and the mixture is smooth. Strain this mixture through a fine sieve to remove the seeds, then let it cool. Meanwhile, sprinkle the gelatin over the cold water in a small bowl and let it bloom for about 5 minutes. Afterward, warm it gently until fully dissolved and stir it into the raspberry puree. In a separate bowl, whip the chilled heavy cream until soft peaks form. Gently fold the whipped cream into the raspberry mixture until well combined.
3. Prepare the Chocolate Mousse:
For the chocolate mousse, place the chopped chocolate in a heatproof bowl. Bloom the gelatin in cold water for 5 minutes, then warm it up until dissolved. Heat 1/2 cup of heavy cream until hot (but not boiling), then pour it over the chopped chocolate. Stir until smooth. Mix in the dissolved gelatin. Whip the remaining 3/4 cup of heavy cream to soft peaks. Gently fold the whipped cream into the chocolate mixture until well-blended and airy.
4. Assemble the Cake:
Once the chocolate cake is cool, make sure it’s in a clean springform or mousse ring fitted on a serving plate. Pour the raspberry mousse evenly over the cake, smoothing the top with a spatula. Chill it in the fridge for about 1 hour until set but still slightly soft. Then, pour the chocolate mousse over the raspberry layer, smoothing it out evenly on top. Return the whole cake to the fridge and let it chill for at least 4 hours, or overnight if possible, until fully set.
5. Make the Ganache Glaze:
When you’re ready to finish off the dessert, prepare the ganache. Heat the heavy cream until it begins to simmer. Pour the hot cream over the chopped semisweet chocolate and let sit for 2 minutes. Stir gently until it’s smooth and glossy. Allow it to cool slightly until just thickened but still pourable.
6. Glaze and Decorate:
Carefully remove the cake from the springform or mousse ring. Drizzle the ganache over the top, allowing it to drip down the sides. Arrange the fresh raspberries around the top edge and sprinkle with chocolate curls in the center. You can add fresh mint leaves for a lovely garnish if you like.
7. Serve:
Chill the cake until the ganache is set. For slicing, use a warm knife (dip it in hot water and wipe it dry between cuts) to get nice clean slices. Enjoy this luscious chocolate and raspberry delight at your next celebration or gathering!
This cake is a beautiful layering of moist chocolate, tart raspberry mousse, and rich chocolate mousse, topped with a glossy ganache and fresh raspberries. It’s truly a showstopper dessert sure to impress your guests!
Can I Use Different Berries in the Mousse?
Absolutely! While raspberries provide a lovely tartness, you can substitute with other berries like strawberries, blueberries, or blackberries. Just adjust the sugar based on the sweetness of the fruit you choose.
Can I Make This Cake Gluten-Free?
Yes, you can! Substitute the all-purpose flour with a 1:1 gluten-free flour blend. Ensure it contains xanthan gum for the best texture, or you may need to add it separately.
How Do I Store Leftover Cake?
Store any leftover cake in an airtight container in the refrigerator for up to 3 days. If you want to keep it longer, consider freezing individual slices wrapped tightly. Just make sure to thaw in the fridge when you’re ready to enjoy!
Can I Make This Cake in Advance?
Definitely! You can make this cake a day or two in advance. Just ensure to keep it in the fridge once assembled. This also allows the flavors to meld beautifully!