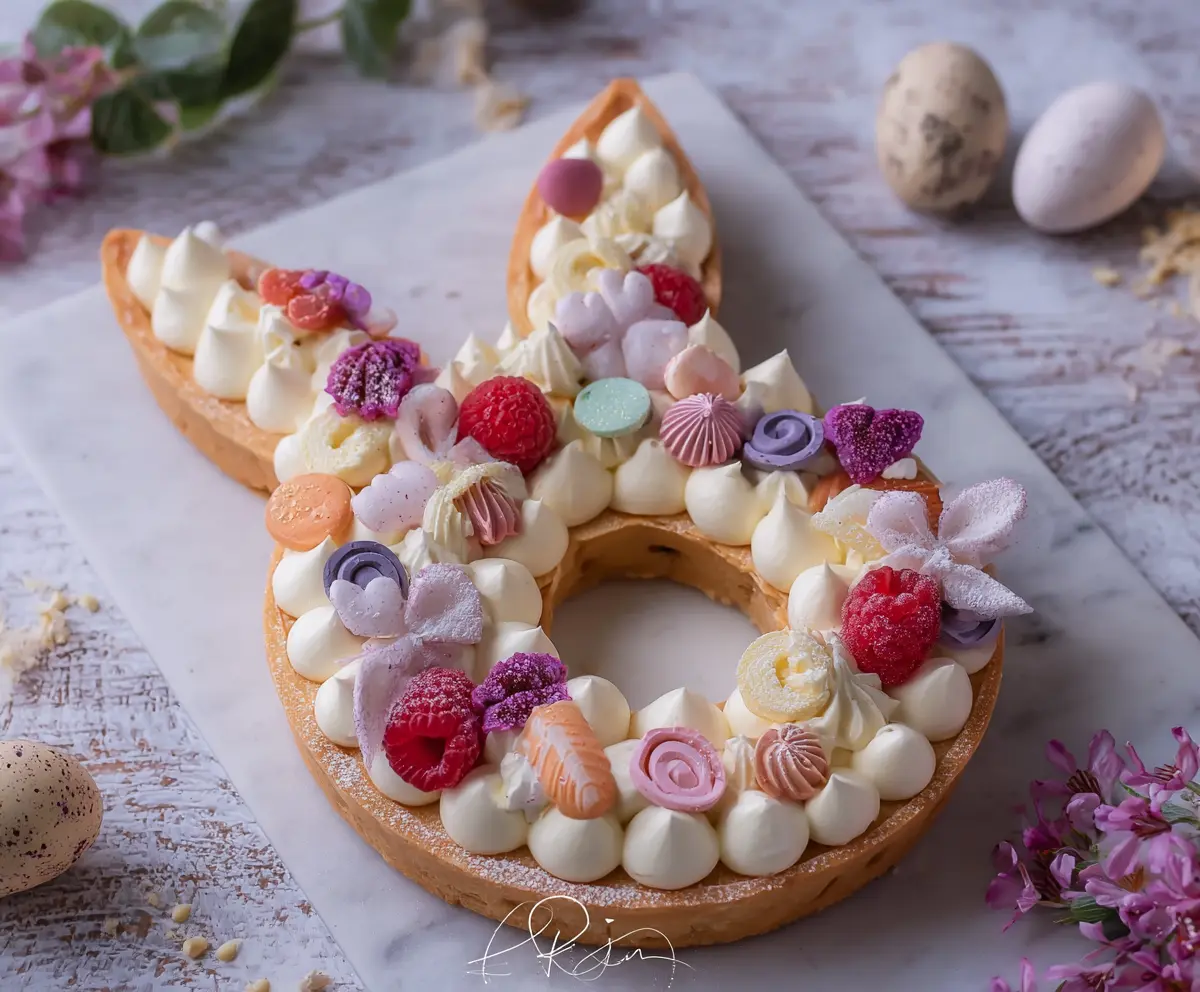
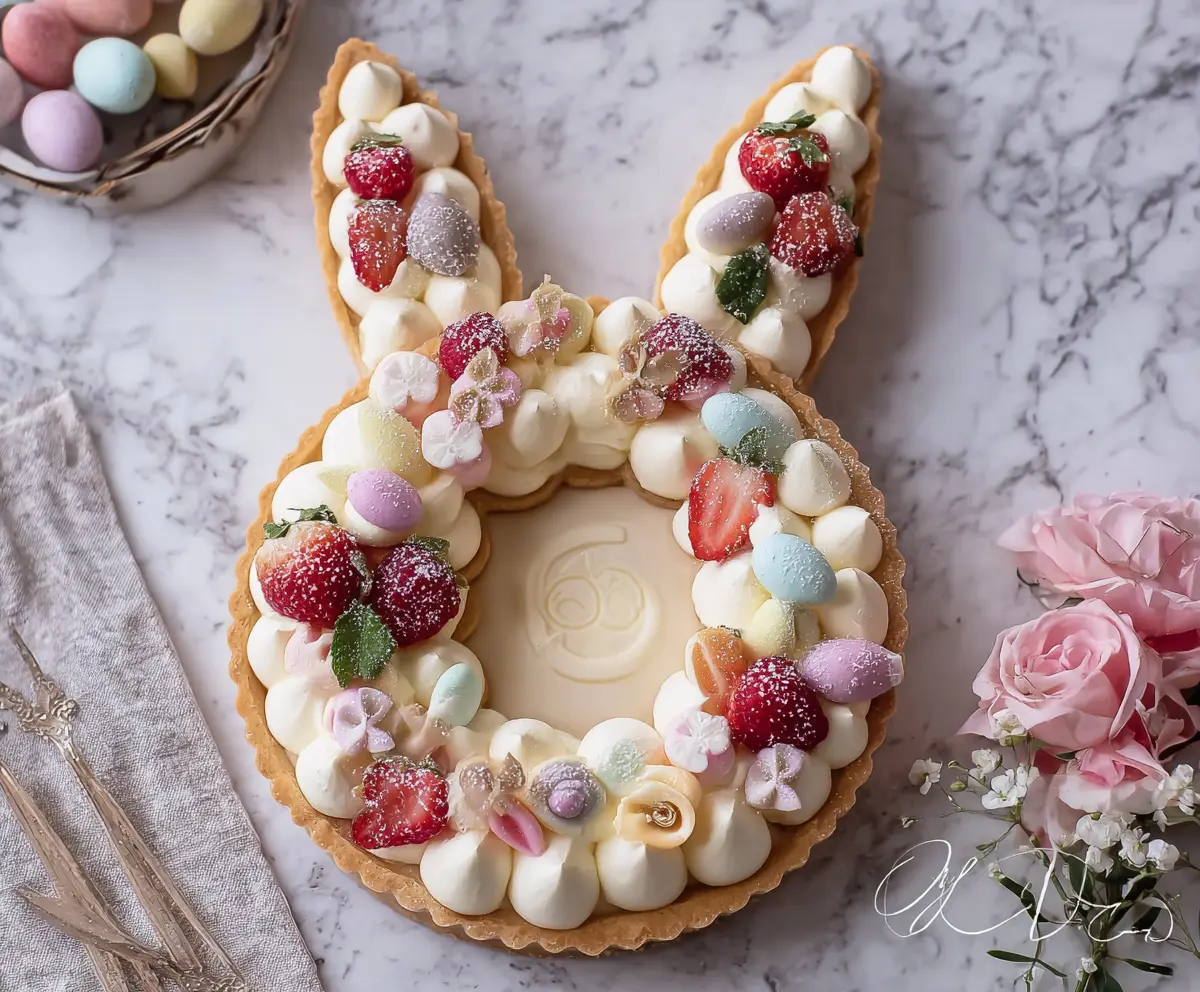
This fun Easter Bunny Cream Tart is a treat for your eyes and taste buds! With a crispy crust and creamy filling, it’s perfect for celebrating the holiday.
The best part? You can get creative with how you decorate it! Each time I make it, I let my inner artist shine—so sprinkle away, friends! 🐰
I love serving this tart at family gatherings. Everyone gets so excited when they see the cute bunny design! It brings smiles and yummy bites all around.
Ingredients & Substitutions
All-purpose flour: This is the base for your tart crust. If you need a gluten-free option, you can use a gluten-free flour blend, but ensure the blend has a binding agent like xanthan gum.
Unsalted butter: Cold butter is key for a flaky crust. If you’re dairy-free, try using coconut oil or a plant-based butter alternative. They can mimic the texture quite well.
Cream cheese: This gives the filling a rich texture. If you want a lighter option, use Greek yogurt. It gives a nice tang, but may be less creamy.
Heavy cream: For the whip, you need heavy cream to achieve those perfect stiff peaks. If you prefer a non-dairy option, coconut cream works great too!
Edible flowers: These not only look beautiful but add a delicate touch. If you can’t find edible flowers, use more fruits like strawberries or blueberries for a pop of color.
How Do I Achieve a Perfect Tart Crust?
The tart crust is crucial for this dessert, so let’s get it just right! Start by keeping your ingredients cold—this helps prevent the butter from melting too soon and ensures a flaky texture. Here’s how to go about it:
- Mix the flour, powdered sugar, and salt then pulse in cold butter until crumbly.
- Add the egg yolk and vanilla; pulse until the dough just holds together.
- Handle the dough gently! Over-kneading can make your crust tough. Just form a ball, flatten it, and chill.
- When rolling, keep your surface lightly floured to avoid sticking.
Pricking the dough with a fork helps it bake evenly, so don’t skip that step! Letting it cool completely ensures the cream filling doesn’t melt into the crust.
How to Make Easter Bunny Cream Tart
Ingredients You’ll Need:
For the Tart Crust:
- 250 g all-purpose flour
- 125 g unsalted butter, cold and cubed
- 100 g powdered sugar
- 1 egg yolk
- 1 tsp vanilla extract
- Pinch of salt
For the Cream Filling:
- 500 ml heavy cream (chilled)
- 250 g cream cheese, softened
- 100 g powdered sugar
- 1 tsp vanilla extract
For Decoration:
- Fresh raspberries
- Edible flowers (variety of pastel colors)
- Assorted pastel-colored meringue kisses or shells
- Edible glitter or powdered sugar for dusting
- Small pastel-colored candies or white chocolate shapes (optional)
- Light fruit jelly or pastel fruit candies for flower decoration
Time Needed:
This delightful Easter Bunny Cream Tart will take about 2 hours in total. You’ll spend about 30 minutes preparing the tart crust, 20 minutes baking it, and around 30 minutes making the cream filling and assembling the tart. After all that delicious work, don’t forget to chill it in the fridge for 1 hour before serving!
Step-by-Step Instructions:
1. Prepare the Tart Crust:
Start by preheating your oven to 180°C (350°F). In a food processor, mix the flour, powdered sugar, and a pinch of salt. Add the cold cubed butter and pulse until the mix looks like coarse crumbs. Next, add the egg yolk and vanilla extract. Pulse until the dough just comes together. Now turn the dough onto a lightly floured surface and knead it briefly into a ball, then flatten it into a disk. Wrap it in plastic wrap and pop it into the fridge for at least 30 minutes to chill.
2. Shape and Bake the Tart Crust:
Once the dough is chilled, roll it out on a floured surface until it’s about 0.5 cm thick. Use a bunny-shaped cookie cutter or a template to cut out a large bunny shape with a hole in the center. Carefully transfer the shape onto a parchment paper-lined baking tray. Lightly prick the dough with a fork to prevent bubbling while baking. Bake for 15-20 minutes, or until the tart crust is golden brown and crisp. Let it cool completely on a wire rack.
3. Prepare the Cream Filling:
In a large bowl, use a mixer to beat the softened cream cheese with powdered sugar and vanilla extract until smooth and creamy. In another bowl, whip the chilled heavy cream until you reach stiff peaks. Gently fold the whipped cream into the cream cheese mixture until it’s fully combined and smooth. This will create a light, fluffy filling for your tart!
4. Assemble the Tart:
Let’s bring it all together! Transfer the cream filling into a piping bag fitted with a round tip. Pipe even dollops of cream onto the cooled tart base, covering the entire bunny shape. For a fun twist, you can add another layer by placing a second tart crust on top and repeating the piped dollops. Yummy!
5. Decorate:
Now for the colorful part! Start decorating your tart with fresh raspberries, spacing them evenly among the cream dollops. Add an assortment of edible flowers and pastel-colored meringue kisses or shells on top to make it look festive. If you like, sprinkle small pastel-colored candies or white chocolate decorations for an extra touch. Finish it off with a light dusting of powdered sugar or edible glitter for elegance!
6. Serve:
Chill your beautifully decorated tart in the fridge for at least 1 hour to let the cream set. When it’s time to serve, slice it carefully and enjoy this delightful Easter dessert centerpiece with your family and friends!
Enjoy your wonderfully festive Easter Bunny Cream Tart!
Can I Use Different Types of Cream for the Filling?
You can use a low-fat cream or a non-dairy whipped topping if you prefer a lighter version! Just keep in mind that the texture and flavor will be different, so choose a substitute that complements the tart.
How Long Will Leftovers Last?
Any leftover tart can be stored in an airtight container in the fridge for up to 2-3 days. To keep the decorations fresh, it’s best to add any toppings, like fruits or edible flowers, just before serving.
Can I Freeze the Tart?
Yes, you can freeze the tart! To do this, assemble the tart without decorations, wrap it tightly, and store it in the freezer. When you’re ready to serve, just thaw it in the fridge overnight and then add your decorative touches.
What If I Don’t Have a Bunny-Shaped Cutter?
No problem at all! You can use any shape of cookie cutter you have, or even cut the dough into a simple round or rectangular shape. The tart’s flavor will still be delicious, regardless of its shape!