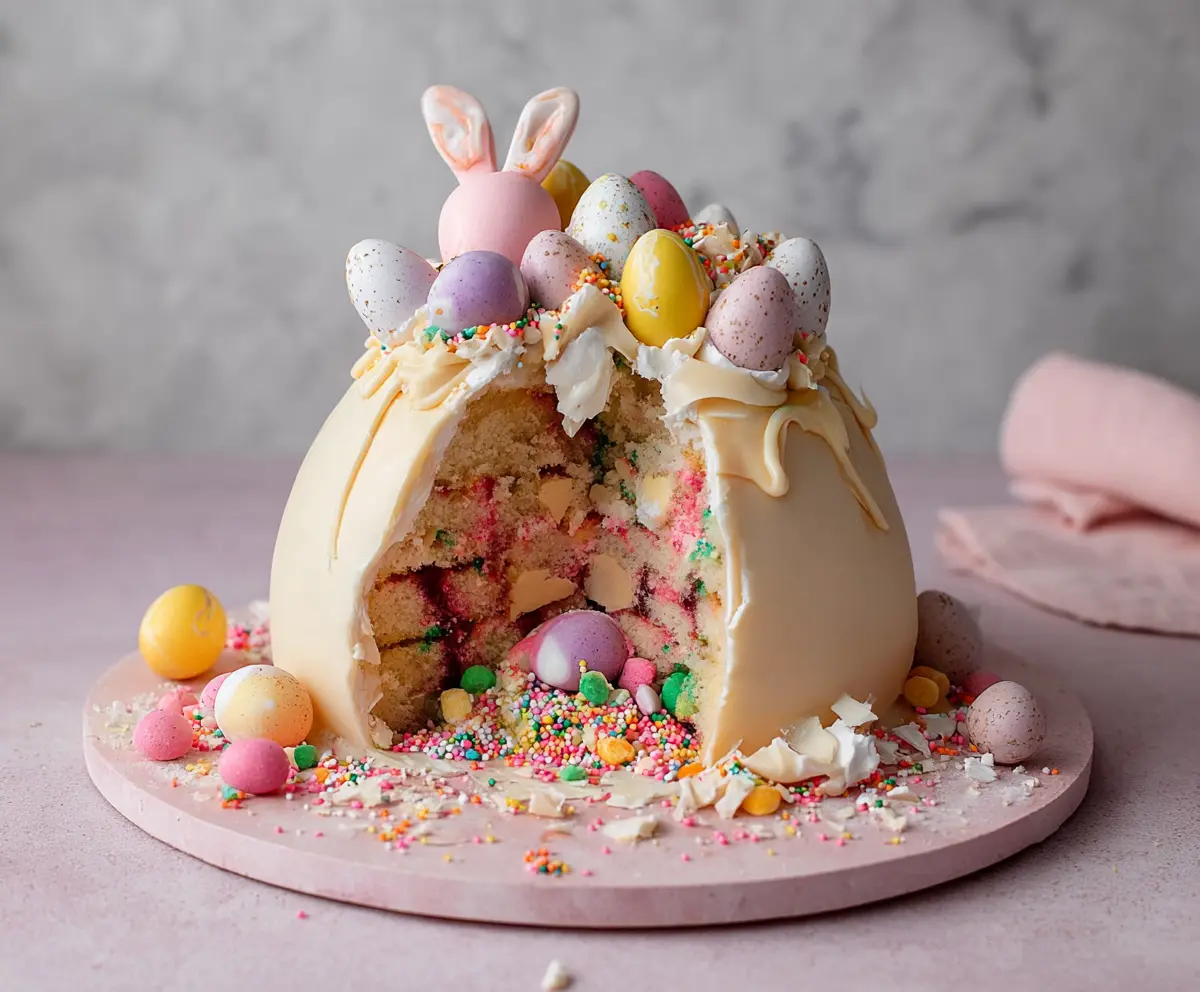
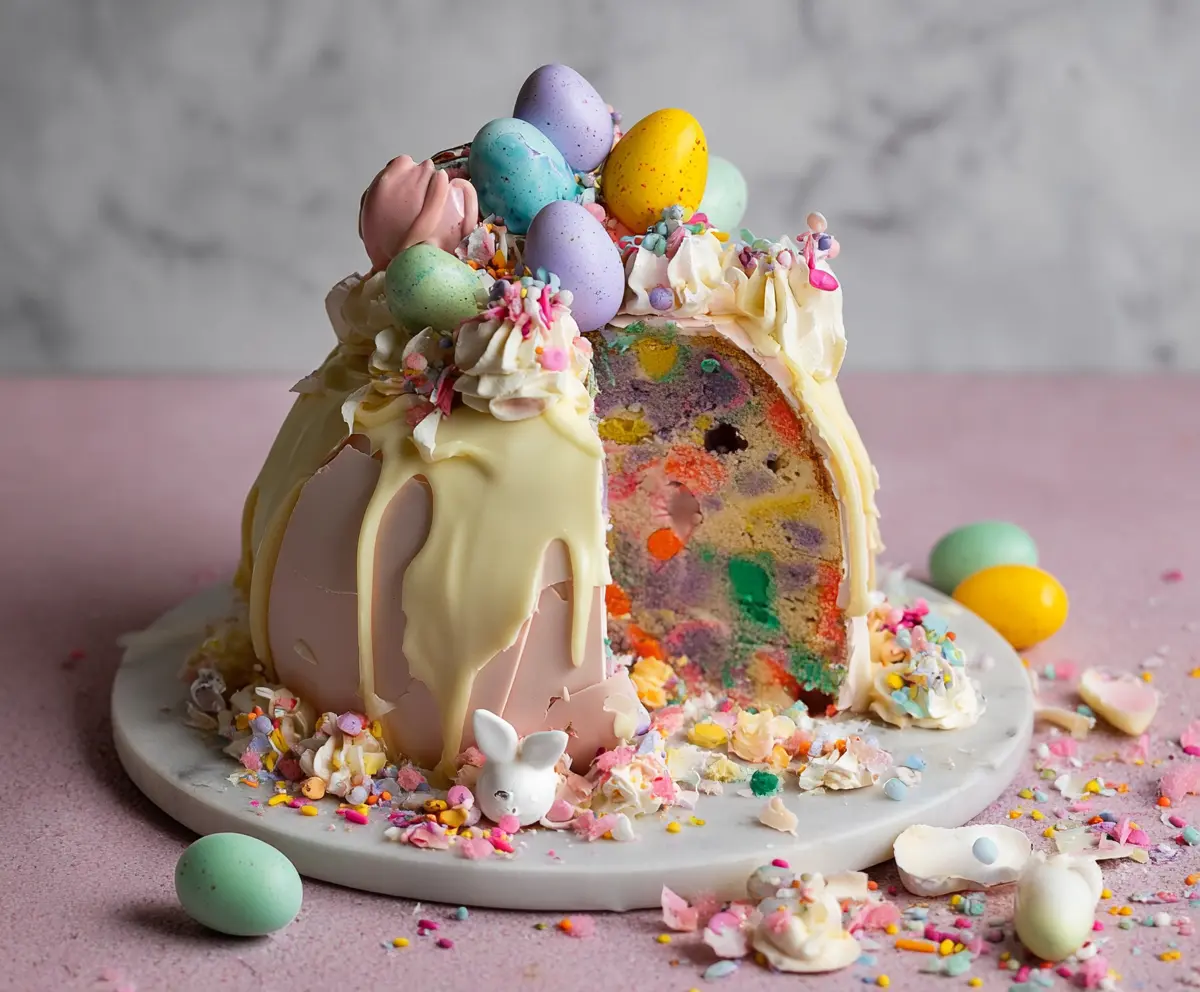
This fun Easter Egg Smash Cake is a showstopper! It’s a chocolate cake filled with creamy frosting and topped with colorful candy eggs. When you cut it open, the eggs spill out—how cool is that?
Making this cake is a blast, especially if you get to decorate it with the kids. Just be prepared for some giggles when they see the surprise inside! 🐣 I love serving it at family gatherings; it always gets big smiles!
Key Ingredients & Substitutions
All-Purpose Flour: This flour works really well for the cake’s structure. If you’re gluten-free, try a gluten-free all-purpose blend instead for similar results.
Unsalted Butter: I like using unsalted butter to control the saltiness. If you’re in a pinch, margarine can substitute, but butter adds a richer flavor.
Rainbow Sprinkles: They give the cake a fun, festive look. If you’re avoiding artificial colors, look for natural sprinkles or skip them altogether for a classic white cake.
White Chocolate: For the shell, I recommend white chocolate melts for ease. If you need a dairy-free option, try dairy-free white chocolate alternatives.
Candy Coated Chocolate Eggs: I love pastel Easter eggs for decoration. You can use any small candies, such as jelly beans or chocolate-covered raisins if you can’t find these.
What’s the Best Way to Make a Whipped Buttercream Frosting?
Getting the perfect buttercream can be tricky, but it’s key for this cake. Start by ensuring your butter is at room temperature for easy mixing. Then, add your powdered sugar a bit at a time to avoid a sugary cloud!
- Beat butter alone until creamy for a couple of minutes.
- Gradually mix in powdered sugar on low speed to prevent spills.
- Add vanilla and salt for flavor.
- Incorporate heavy cream or milk little by little until you reach your desired consistency.
- Beat for 3-4 minutes to make it fluffy and light.
How to Melt Chocolate for the Perfect Shell?
Melted chocolate can be fussy, but here’s a simple technique! You can use either the microwave or a double boiler. If using the microwave, heat in short bursts (15-30 seconds) and stir in between.
- For the microwave: Place white chocolate melts in a microwave-safe bowl, heat in 30-second intervals, stirring each time.
- For a double boiler: Set a heatproof bowl over simmering water, ensuring the bottom doesn’t touch the water. Stir until smooth.
- Let the melted chocolate cool slightly, but it should remain pourable for coating your cake or creating shells.
Epic Easter Egg Smash Cake
Ingredients You’ll Need:
For the Cake:
- 2 ½ cups all-purpose flour
- 2 ½ tsp baking powder
- ½ tsp salt
- 1 cup unsalted butter, softened
- 1 ¾ cups granulated sugar
- 4 large eggs
- 2 tsp vanilla extract
- 1 cup whole milk
- ½ cup rainbow sprinkles (jimmies)
For the Buttercream Frosting:
- 1 ½ cups unsalted butter, softened
- 5 cups powdered sugar
- 2 tsp vanilla extract
- 3-4 tbsp heavy cream or milk
- Pinch of salt
For the White Chocolate Shell:
- 24 oz white chocolate melts or couverture chocolate
- Food coloring (optional, for pastel shades)
For Decoration and Fillings:
- Assorted candy-coated chocolate Easter eggs (in pastel colors)
- Colorful sprinkles and nonpareils
- Mini marshmallows (optional)
- Edible glitter (optional)
- Pink candy melts or colored white chocolate for “bunny ears”
How Much Time Will You Need?
This delightful Easter cake will take about 1 hour to prepare, plus an additional 25-30 minutes to bake and 20-30 minutes to chill for assembly. After decorating, plan to spend a bit of time letting the chocolate shell set. The final result is a showstopper perfect for your holiday celebration!
Step-by-Step Instructions:
1. Prepare the Cake Batter:
First, preheat your oven to 350°F (175°C). Grease and flour two or three round cake pans (or dome-shaped pans for a rounded cake). In a medium bowl, whisk together the flour, baking powder, and salt. In a large bowl, beat the softened butter and granulated sugar until it’s light and fluffy. Add the eggs one at a time, making sure to beat well after each addition. Then, stir in the vanilla extract.
Next, alternate adding the dry ingredient mixture and whole milk to the butter mixture, starting and ending with the dry ingredients. Stir just until combined, then gently fold in the rainbow sprinkles, being careful not to overmix.
2. Bake the Cake:
Pour the batter evenly into the prepared pans. Bake in your preheated oven for 25-30 minutes, or until a toothpick inserted into the center comes out clean. Once baked, let the cakes cool in the pan for 10 minutes before transferring them to wire racks to cool completely.
3. Prepare Buttercream Frosting:
While the cake is cooling, beat the softened butter until creamy. Gradually add the powdered sugar, vanilla extract, and a pinch of salt. Gradually incorporate heavy cream or milk, one tablespoon at a time, until you reach your desired frosting consistency. Beat the mixture for 3-4 minutes until it’s fluffy and light in color.
4. Assemble the Cake:
Once your cake layers are completely cool, level them if needed. On a large cake board, place the first cake layer and spread a thick layer of buttercream frosting on top. Create a hidden surprise by adding a good handful of candy-coated chocolate Easter eggs and some more sprinkles on this layer. Then, gently place the next layer on top and press down lightly to secure it.
Next, apply a crumb coat (a thin layer of frosting to trap crumbs) over the entire cake and chill it in the fridge for 20-30 minutes. After chilling, add a final thick layer of buttercream frosting, smoothing it around for a clean finish.
5. Create the White Chocolate Shell:
Melt the white chocolate melts in the microwave or using a double boiler, stirring until smooth. Let it cool slightly but make sure it remains pourable. For the shell, you have two options: use a dome-shaped bowl lined with plastic wrap, pour the melted chocolate inside, rotate it to coat the sides, and then chill until solid. Alternatively, you can carefully drip and spread the melted chocolate directly onto the cake to create a smooth shell effect. Allow the chocolate to set firmly in the fridge.
6. Decorate the Cake:
Once the chocolate shell is set, pipe additional buttercream frosting on top to create a nest effect. Arrange the pastel candy-coated eggs upright on top of the nest with colorful sprinkles and mini marshmallows around the base for added flair. To make the cute bunny ears, mold pale pink candy melts or white chocolate into ear shapes and attach them to a pink candy or fondant ball to resemble a bunny head. Position it on top of the cake for a fun finishing touch.
7. Serving:
When you cut into this cake, it will “smash,” revealing the hidden stash of candy eggs and sprinkles that spill out for a delightful Easter surprise. Serve immediately and enjoy this fun and festive treat!
This Epic Easter Egg Smash Cake combines soft, moist funfetti cake with a surprising candy center, all encased in a smooth white chocolate shell and decorated with playful Easter-themed candies, making it perfect for your holiday celebration.
Can I Use a Different Type of Milk?
Absolutely! You can use any milk you prefer, such as almond milk, oat milk, or even buttermilk for a richer flavor. Just make sure it’s a similar measurement to maintain the cake’s texture.
How Can I Store Leftover Cake?
Store any leftover cake in an airtight container in the refrigerator for up to 3-4 days. If you prefer, you can also freeze slices wrapped tightly in plastic wrap and foil for up to 3 months. Just let them thaw in the fridge before enjoying them again!
Can I Make This Cake Gluten-Free?
Yes! You can substitute the all-purpose flour with a gluten-free flour blend. Make sure it includes xanthan gum for better texture, or you can add it separately if your blend doesn’t include it.
What If I Don’t Have White Chocolate Melts?
If you don’t have white chocolate melts, you can use chopped white chocolate bars instead—they work just as well. Just make sure to follow the melting instructions carefully to avoid seizing!