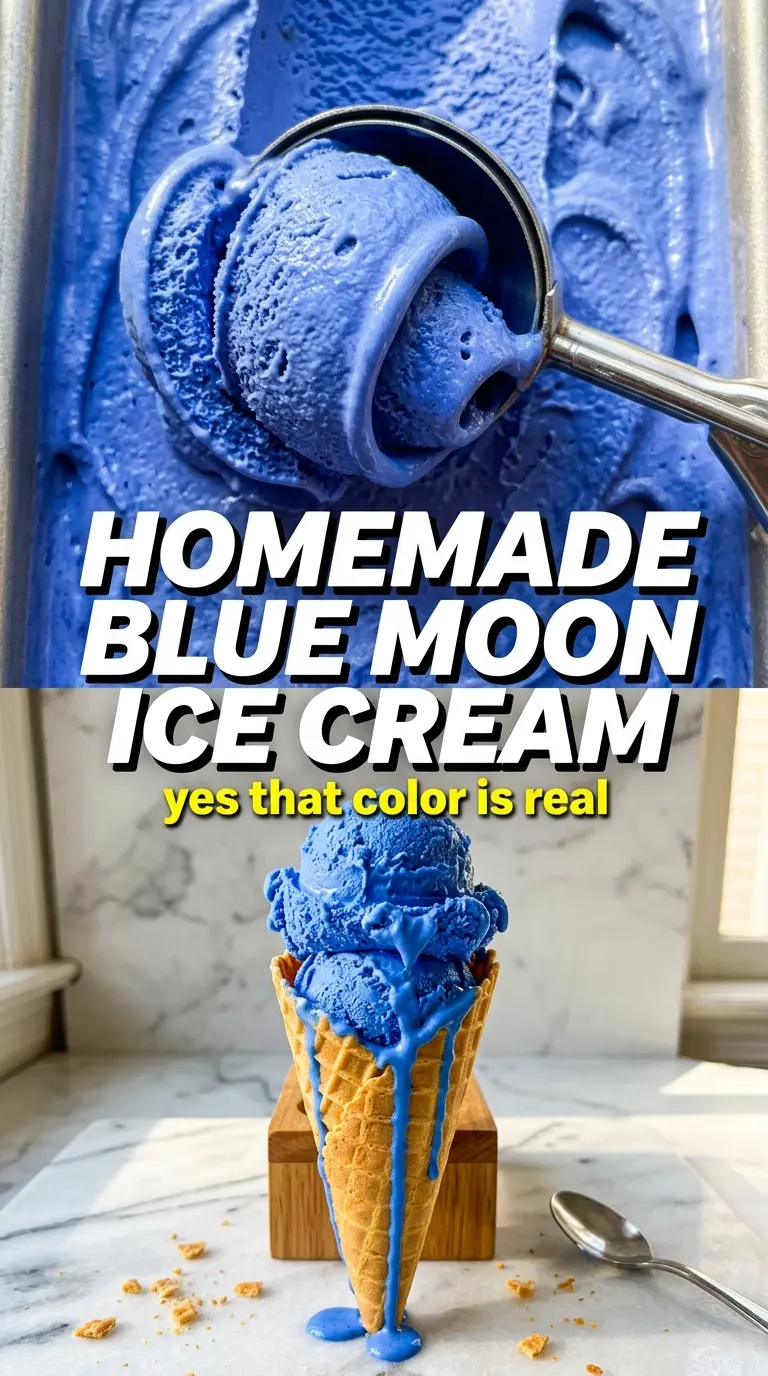
Electric blue ice cream with that mysterious almond-vanilla-fruity flavor earns its place fast, because it tastes like a scoop of nostalgia you can’t quite pin down. The texture is rich and custardy, the color is unmistakable, and the finish lands somewhere between cherry, almond, and a soft citrus note without turning sharp or perfumy.
This version uses a real custard base, which gives the ice cream body and keeps it from freezing into a hard block. The yolks and sugar are cooked just enough to thicken the mixture without scrambling it, then the extracts go in after the custard is off the heat so their flavors stay clean. The blue food coloring is added at the end, a few drops at a time, so you can stop when it hits that vivid, electric shade instead of wandering into navy territory.
Below, I’ve included the one part that matters most when you’re chasing the right texture, plus a few practical swaps and fixes for when you want the color brighter, the flavor softer, or the batch dairy-free.
The custard chilled down beautifully and churned into the creamiest scoopable texture. I loved that the almond and raspberry came through without tasting fake, and the color was exactly the bright Blue Moon blue I remember.
Save this Blue Moon Ice Cream for the nights when you want that electric color and nostalgic almond-fruity flavor in a homemade scoop.
The Custard Step That Keeps Blue Moon Ice Cream Creamy
The mistake that ruins homemade ice cream is rushing the base and pulling it too soon, or too late. With this style of custard, you want the mixture to reach about 175°F, where it thickens enough to coat a spoon without turning into scrambled eggs. If you let it boil, the yolks seize and the texture turns grainy.
The other thing that matters here is cooling. Warm custard poured into an ice cream maker won’t churn properly, and it can melt the cold canister enough to slow freezing. Strain out any tiny bits after cooking, then chill the base until it’s fully cold all the way through. That gives you the smoothest churn and the cleanest flavor.
- Egg yolks — These build the custard body and give the finished ice cream that rich, scoopable texture. Whole eggs won’t give the same silkiness, and skipping the yolks entirely makes the base lean and icy.
- Heavy cream — This is where the plush mouthfeel comes from. You need the fat here; half-and-half will work in a pinch, but the ice cream won’t be as dense or luxurious.
- Whole milk — Milk loosens the base just enough so it freezes with a clean scoop instead of tasting heavy. Lower-fat milk can work, but the texture gets harder in the freezer.
- Almond, raspberry, and lemon extracts — This is the flavor signature. Almond gives the classic Blue Moon note, raspberry or blue raspberry pushes it into that nostalgic fruit-candy territory, and lemon keeps it from tasting flat or one-dimensional.
- Blue food coloring — This doesn’t change the flavor, but it does change the experience. Add it slowly after the custard is cooled a bit so you can control the shade instead of overshooting the bright blue look.
What Each Ingredient Is Actually Doing in This Ice Cream
- Base ingredient (cream, milk, or custard) — This provides the foundation and richness. Quality matters.
- Sweetener (sugar, honey, or condensed milk) — This sweetens and prevents ice crystals. The ratio is critical.
- Flavor element (vanilla, fruit, chocolate, coffee, or other) — This defines the ice cream personality. Use quality ingredients.
- Egg yolks (if making custard base) — These create richness and silky texture. Optional but elevates ice cream.
- Churning (if using ice cream maker) — This incorporates air and prevents ice crystals. Critical for smooth texture.
- Freezing temperature and time — Proper freezing prevents rock-hard texture. Store at 0°F or below.
- Mix-ins (chocolate, cookies, fruit, or swirls) — These add texture and prevent one-dimensional flavor. Add near end of churning.
- Serving temperature (slightly soft, not rock hard) — This provides creamy mouthfeel. Remove from freezer 5 minutes before serving.
Building the Flavor Without Breaking the Base
Heat the cream and milk until steaming, not boiling. You want small bubbles around the edge of the pan and a faint shimmer across the surface. Whisking the hot dairy into the yolks slowly keeps them from curdling, which is the failure point here if you dump it in all at once.
Return the custard to the saucepan and cook it gently, stirring constantly with a spatula or wooden spoon. You’re looking for a slightly thicker texture that coats the back of a spoon and leaves a clean line when you drag a finger through it. Pull it off the heat before it starts to bubble hard; once you see active boiling, you’re already past the safe point.
Stir in the extracts after the custard comes off the heat. High heat can make the raspberry and lemon notes disappear faster, and it can make almond extract taste harsher than it should. Add the blue food coloring a few drops at a time, stirring well between additions, until it looks brighter than you think you need. It mellows a touch after freezing.
Cool the base completely, then refrigerate it for at least 4 hours before churning. A cold base freezes faster in the machine, which means smaller ice crystals and smoother ice cream. If the mixture still feels warm, keep chilling it instead of forcing it into the churner early.
How to Change the Color, Flavor, or Dairy Mix Without Losing the Nostalgia
Dairy-Free Blue Moon Ice Cream
Use full-fat canned coconut milk in place of the cream and milk, then keep the rest of the custard method the same if you’re using an egg-based dairy-free base. The texture will be a little softer and the coconut note will show through, so the almond extract becomes even more important for keeping the classic Blue Moon character.
Stronger Almond, Softer Fruit
If you want the flavor closer to the old-school Midwest version, raise the almond extract slightly and cut back the raspberry flavoring. That gives you a more mysterious, creamy almond-vanilla profile instead of a bright candy-fruit note.
Color Without Changing Taste
Use gel food coloring if you want a more intense blue with less liquid added to the base. Liquid coloring works fine, but gel gives you a brighter shade faster, which helps if you’re trying to hit that dramatic electric blue without thinning the custard.
Storage and Reheating
- Refrigerator: Chill the custard base up to 2 days before churning. Once churned, the ice cream keeps well in the freezer, not the fridge.
- Freezer: Freeze in an airtight container with parchment pressed on top for up to 2 weeks. After that, it can start to pick up ice crystals and lose some of its creamy texture.
- Reheating: Not applicable. For the best scoop, let the container sit at room temperature for 5 to 10 minutes before serving so it softens at the edges instead of cracking the top.
Questions I Get Asked About This Recipe
Blue Moon Ice Cream
Ingredients
Equipment
Method
- In a saucepan, heat the heavy cream and whole milk until steaming. Keep the heat gentle so the mixture doesn’t boil over.
- Slowly whisk the steaming dairy into the egg yolks that have been beaten with granulated sugar. Pour gradually while whisking to prevent scrambling.
- Return the mixture to the saucepan and cook, stirring constantly, until thick enough to coat a spoon and the custard reaches 175F. Aim for a smooth custard with no egg bits.
- Strain the custard and cool it slightly. Use a fine-mesh strainer to remove any tiny curdled bits.
- Stir in almond extract, vanilla extract, raspberry extract or blue raspberry flavoring, and lemon extract. Mix until fully combined and fragrant.
- Add blue food coloring a few drops at a time until the desired electric blue is achieved. Stop once the color is vivid and uniform.
- Cool the custard completely before chilling. Let it cool to room temperature, then refrigerate.
- Refrigerate the custard for 4 hours. Chill until thoroughly cold before churning.
- Churn the chilled custard in an ice cream maker according to the manufacturer’s directions. Stop when the texture looks like soft-serve.
- Transfer to a freezer-safe container and freeze until firm. Freeze long enough to scoop cleanly, then serve.