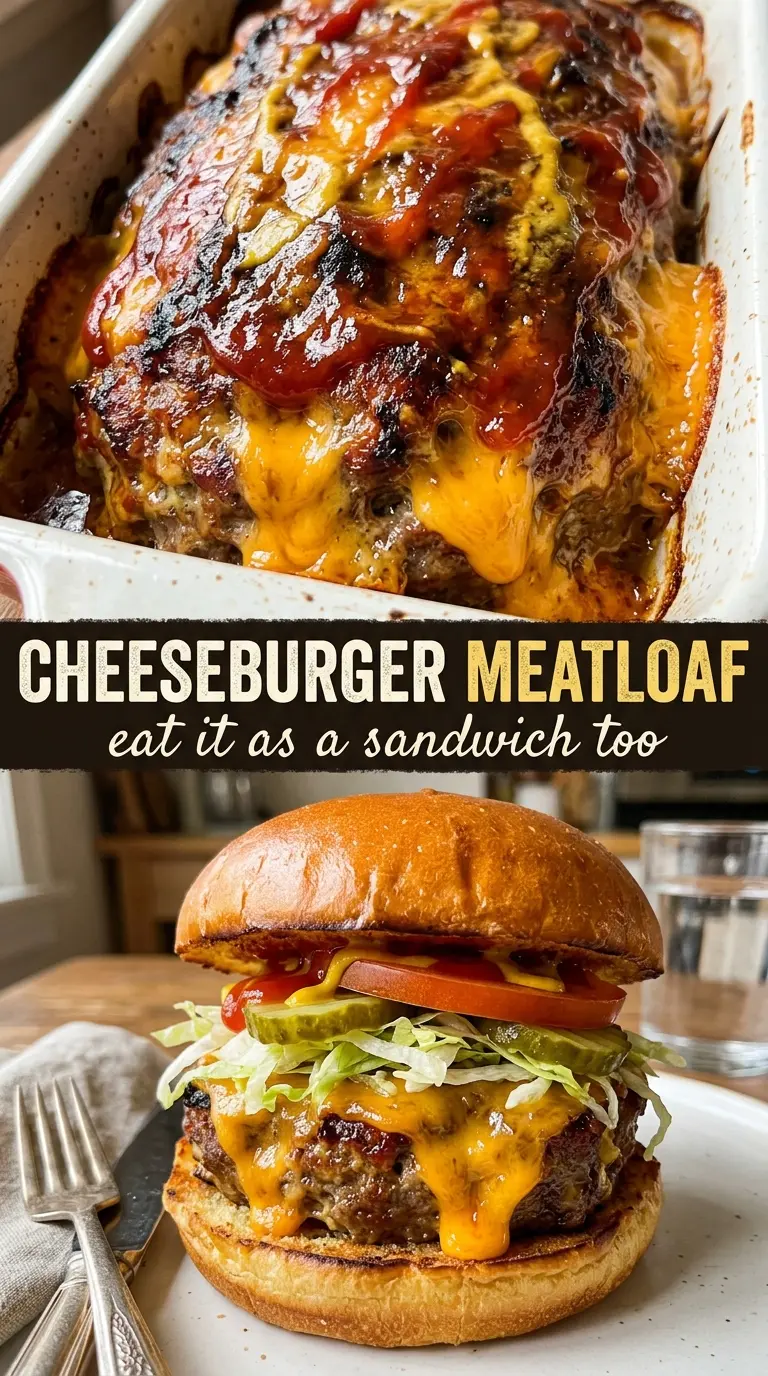
Cheeseburger meatloaf brings the best parts of a classic burger into one sliceable, weeknight-friendly pan dinner. The beef stays juicy, the melted cheese runs through the center, and the ketchup-mustard glaze bakes into a sticky top that tastes familiar in the best way. Serve it with dill pickles and you get that salty, tangy bite that makes the whole thing click.
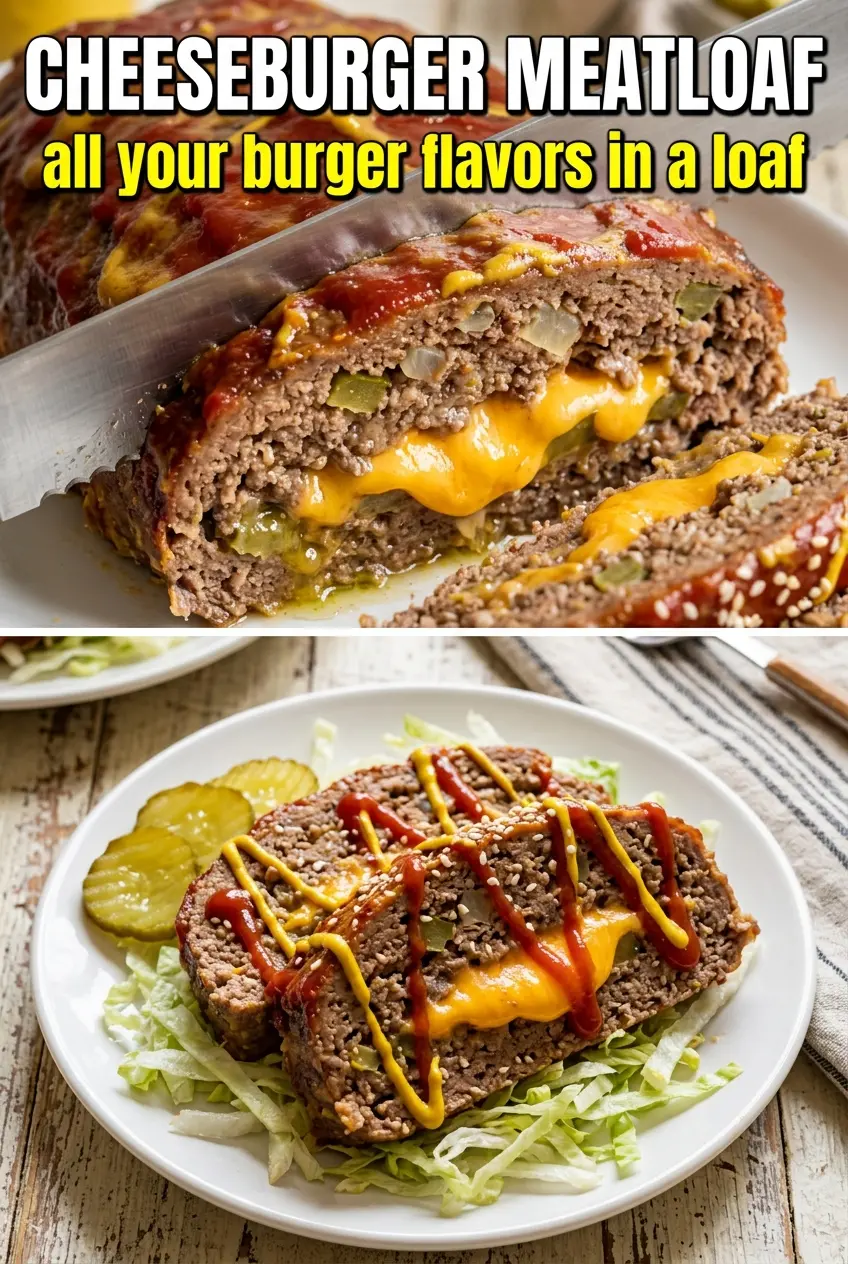
What makes this version work is balance. The breadcrumbs and milk keep the loaf tender, but the onion gets grated finely so it melts into the meat instead of leaving crunchy bits behind. The cheese goes in the middle, not mixed through the whole loaf, so you get a real cheesy layer when you slice it instead of just scattered pockets that disappear into the beef.
Below, I’ll walk through the part that matters most: sealing the loaf so the cheese stays put, getting the glaze to caramelize without burning, and a few swaps that still keep the cheeseburger character intact.
The cheese stayed right in the middle and the glaze set up with that sticky burger taste instead of sliding off. I sliced it after 10 minutes and the layers held together perfectly.
Like this cheeseburger meatloaf? Save it to Pinterest for the nights when you want a cheesy center and a ketchup-mustard glaze in one easy pan dinner.
The Trick to Keeping the Cheese in the Middle
The part that usually goes wrong with stuffed meatloaf is the seal. If the edges are thin or the top layer is pressed too aggressively, the cheese can leak out and pool around the loaf instead of staying inside where it belongs. The fix is simple: spread the bottom layer evenly, lay the cheese across the center with a little border at the edges, then cover it with the top layer and pinch the seam gently so the meat meets itself.
Ground beef with an 80/20 ratio matters here because it stays moist enough to hold up around the cheese without turning greasy. Leaner beef can work, but the loaf will eat drier and the slices won’t have the same soft, burger-like texture. The grated onion also matters more than people think. It disappears into the loaf and adds moisture and flavor without leaving little chunks that can make the interior fall apart.
What Each Ingredient Is Doing in This Burger-Style Loaf
- Ground beef — The 80/20 blend gives you enough fat for a juicy slice and a beefy flavor that reads like a burger, not a dry meatbrick. If you use lean beef, the loaf still works, but it benefits from a touch more milk or an extra spoonful of ketchup in the mix.
- Breadcrumbs, egg, and milk — This trio holds the loaf together and keeps the texture tender instead of compacted. The milk softens the crumbs before they bind with the meat, which helps the inside stay light.
- Grated onion — This is the quiet ingredient that keeps the loaf from tasting flat. Fresh onion flavor is important here, but grated onion melts into the mixture, so you get the flavor without any harsh bite.
- Ketchup, mustard, and Worcestershire — These are the cheeseburger cues. Ketchup brings sweetness and moisture, mustard adds that sharp diner-style tang, and Worcestershire deepens the savory note so the loaf tastes like more than seasoned beef.
- American or cheddar cheese — American melts smoothly and gives you that classic burger pull; cheddar brings a sharper flavor and a firmer slice. Both work, but if you want the cleanest melt inside the loaf, American is the easier choice.
- Glaze ingredients — Ketchup and mustard create the burger-style top, while brown sugar helps it caramelize instead of drying out in the oven. Brush it over the loaf right before baking so it doesn’t soak in and disappear.
Building the Loaf So It Bakes Like a Burger, Not a Brick
Mix Just Until the Meat Comes Together
Combine the meat mixture with your hands or a fork and stop as soon as everything looks evenly distributed. If you keep working it, the beef tightens up and the finished loaf turns dense. The mixture should hold together when pressed, but it shouldn’t look paste-like.
Press, Layer, and Seal the Center
Pack half the meat into the loaf pan first, using it to create an even base with a little ridge up the sides. Lay the cheese slices across the middle in a neat layer, then cover them with the remaining meat and press the top closed at the edges. If any cheese is exposed, it’s the first place to leak once the loaf heats up.
Glaze Before the Oven, Not After
Mix the ketchup, mustard, and brown sugar until smooth, then spread it over the top in an even layer. The glaze needs the oven time to thicken and cling to the loaf. If you wait until after baking, you lose the sticky, caramelized surface that makes this taste like a cheeseburger.
Bake to Temperature, Then Let It Sit
Bake until the center reaches 160°F and the top looks shiny, browned, and a little set around the edges. If the glaze starts darkening too quickly, tent the loaf loosely with foil for the last stretch of baking. Resting matters here; cut too soon and the cheese and juices run out instead of staying inside the slices.
How to Tweak It Without Losing the Cheeseburger Flavor
Swap in cheddar for a sharper finish
Cheddar gives the loaf a stronger burger-joint flavor and a little more bite in each slice. It doesn’t melt quite as silkily as American, so you get less of that creamy stretch and more defined pockets of cheese.
Make it gluten-free without changing the texture too much
Use a gluten-free breadcrumb blend in the same amount. The loaf still binds well as long as the crumbs aren’t oversized; if your blend is coarse, let it sit in the milk for a minute or two before mixing so it softens properly.
Skip the dairy and keep it juicy
Swap the milk for an unsweetened plain non-dairy milk and use a dairy-free cheese that melts reasonably well. You’ll lose a little of the classic creamy center, but the loaf still stays moist if you don’t overmix it.
Turn it into a mini meatloaf dinner
Divide the mixture into two smaller loaves and reduce the bake time, checking earlier for doneness. Smaller loaves cook faster and can dry out at the edges if you use the same timing as the full pan version, so start checking the temperature well before the original window ends.
Storage and Reheating
- Refrigerator: Store slices in an airtight container for up to 4 days. The loaf gets a little firmer after chilling, but the flavor holds up well.
- Freezer: It freezes well. Wrap individual slices tightly and freeze for up to 3 months so you can reheat only what you need.
- Reheating: Reheat covered in the oven at 325°F with a splash of water or broth in the pan, or warm slices gently in the microwave at medium power. High heat dries out the beef and makes the cheese grainy.
Answers to the Questions Worth Asking
Cheeseburger Meatloaf
Ingredients
Equipment
Method
- Preheat the oven to 350°F and grease a 9x5 loaf pan.
- Combine ground beef, breadcrumbs, eggs, milk, onion, ketchup, mustard, Worcestershire sauce, salt, and pepper until evenly mixed.
- Press half of the meat mixture into the pan in an even layer.
- Layer cheese slices across the center, then press the remaining meat mixture over the top to seal.
- Mix the glaze ketchup, mustard, and brown sugar, then spread it over the top.
- Bake for 60–70 minutes, until the internal temperature reaches 160°F and the glaze is caramelized (look for darkened, glossy edges on top).
- Rest the meatloaf for 10 minutes before slicing (the juices will settle and the slices will hold their shape).
- Slice and serve with dill pickle slices on top.