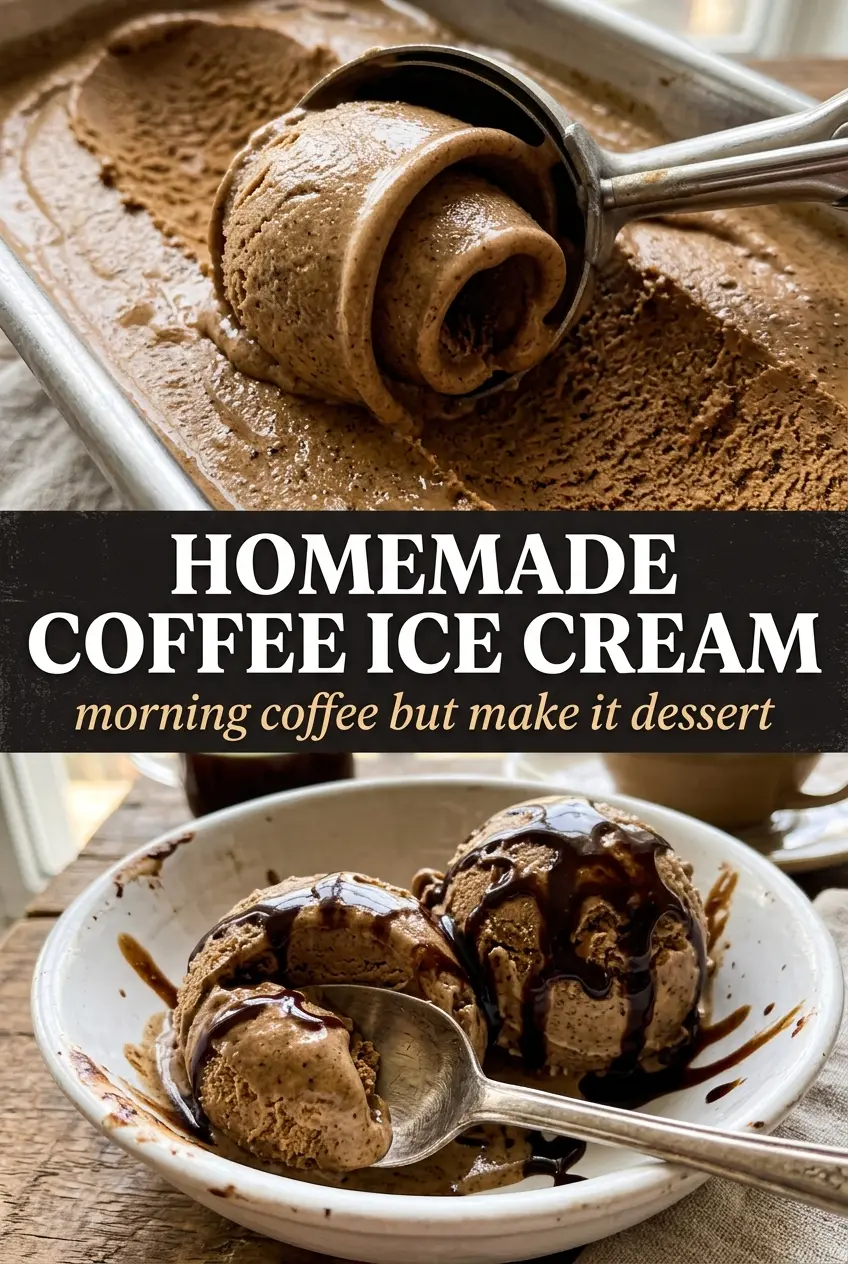
Deep, mahogany-toned coffee ice cream with a custardy body and a sharp espresso edge earns its place fast. The first spoonful is cold, dense, and smooth, with enough roast to taste like actual coffee instead of a vague sweetness wearing coffee perfume. That balance is what makes this version worth making at home.
The base starts as a proper custard, which gives the ice cream its rich texture and keeps the coffee flavor from tasting thin. Instant espresso powder does the heavy lifting because it dissolves cleanly and brings concentrated flavor without watering the mix down. If you add the optional coffee beans, they lend a rounder, deeper note after steeping, but the recipe still stands on its own without them.
Below, I’ll show you how to keep the custard silky, how to push the coffee flavor without making the base bitter, and how to churn it so the final texture stays scoopable instead of icy.
The custard turned out unbelievably smooth, and the espresso flavor stayed bold even after freezing. I strained it twice and the texture was just like the ice cream shop version my husband always orders.
Like this bold coffee custard ice cream? Save it to Pinterest for the nights when you want a deep espresso dessert with a smooth churned finish.
The Custard Trick That Keeps Coffee Ice Cream Smooth
The biggest mistake with coffee ice cream is chasing flavor too hard with extra espresso and ending up with a base that tastes sharp, not deep. This recipe gets around that by layering coffee two ways: steeped whole beans for roundness and instant espresso powder for intensity. That gives you a full coffee flavor without loading the custard with extra liquid.
The other thing that matters is the heat. Egg yolks thicken beautifully at a low simmer, but they curdle fast if the pan runs hot. Pull the custard off the burner the moment it coats the back of a spoon and hits about 175F. If it looks grainy, the heat went too far and the eggs started scrambling; straining it right away catches the small bits before they ruin the texture.
What Each Ingredient Is Actually Doing in This Ice Cream

- Heavy cream — This is where the plush texture comes from. You need the fat here; it keeps the ice cream from freezing into a brick and gives the custard that dense, scoopable body.
- Whole milk — Milk softens the base so it doesn’t taste heavy or cloying. Lower-fat milk will work in a pinch, but the finished ice cream will freeze harder and lose some of that custard richness.
- Instant espresso powder — This is the most important flavor ingredient. It dissolves completely and gives strong coffee taste without adding grounds or extra water, which is why it beats brewed coffee in this recipe.
- Whole coffee beans — Optional, but worth using if you want a deeper, more aromatic coffee note. Steep them in the hot cream mixture and strain them out before adding the yolks; don’t grind them, or you’ll end up with grit.
- Egg yolks — They thicken the custard and help the ice cream stay silky after freezing. If you skip them, you’ll get a lighter base, but it won’t have the same rich mouthfeel.
- Vanilla and salt — They don’t make this taste like vanilla ice cream; they round out the coffee. Salt keeps the espresso from tasting flat and makes the roast notes pop.
Building the Custard Without Scrambling the Eggs
Steeping the Coffee Base
Heat the cream, milk, and optional coffee beans until the mixture is steaming, not boiling. You want little wisps of steam and tiny bubbles at the edge of the pan. Let it sit off the heat for 15 minutes so the beans can do their work, then strain them out before moving on. If you boil it hard, you drive off too much of the creamy aroma and can make the final flavor taste harsh.
Tempering the Yolks
Whisk the yolks and sugar until the mixture turns pale and thick enough to leave ribbons for a second or two. Then drizzle in the hot coffee cream slowly while whisking constantly. That gradual rise in temperature keeps the eggs from seizing. If you dump it all in at once, you’ll get sweet scrambled eggs instead of a smooth custard.
Cooking to the Right Thickness
Return everything to the saucepan and cook over medium-low heat, stirring all the time with a spatula that reaches the corners. The custard is ready when it coats the back of a spoon and a finger swipe leaves a clean line. Stop there. If you wait for it to look thick like pudding in the pan, it’s already gone too far and may curdle before it ever reaches the freezer.
Chilling Before Churning
Strain the custard, stir in the vanilla and salt, then cool it over an ice bath before refrigerating. It needs to be fully cold before it goes into the ice cream maker, or it won’t churn properly and can turn slushy instead of creamy. Four hours is the minimum rest time here, but overnight gives you the best texture and the deepest coffee flavor.
How to Adjust the Coffee Intensity Without Throwing Off the Texture
Go all-in on espresso
Use the full amount of espresso powder and the coffee beans together if you want a bold, nearly affogato-style ice cream. The texture stays the same, but the flavor turns darker and less sweet, so it’s best for people who like their coffee desserts on the intense side.
Skip the beans for a faster base
If you don’t have coffee beans on hand, leave them out and rely on the espresso powder alone. You’ll lose a little roundness, but the custard still freezes with a clean, strong coffee flavor and no extra prep.
Make it dairy-free
Use full-fat canned coconut milk in place of the cream and milk, then cook it gently just the same. The flavor shifts a little toward coconut, and the final texture won’t be quite as rich, but it still churns into a creamy frozen dessert if the base is chilled well.
Add a mocha note
Whisk in a tablespoon or two of cocoa powder with the sugar before tempering the yolks. That gives the ice cream a softer mocha edge without making it taste like chocolate ice cream, and it pairs well with biscotti or brownie pieces.
Storage and Reheating
- Refrigerator: Keep the custard base covered for up to 2 days before churning. After churning, the ice cream keeps for about 2 weeks with the best texture in the first few days.
- Freezer: It freezes well. Press parchment or plastic wrap directly on the surface before sealing the container to cut down on ice crystals.
- Reheating: Not applicable for the finished ice cream, but let it sit at room temperature for 5 to 10 minutes before scooping. If it’s rock hard, don’t microwave it or the edges will melt before the center softens.
Answers to the Questions Worth Asking
Homemade Coffee Ice Cream
Ingredients
Equipment
Method
- Combine heavy cream, whole milk, and whole coffee beans (if using) in a saucepan and heat until steaming. Steep for 15 minutes, then strain out beans.
- Whisk instant espresso powder into the warm coffee cream until dissolved. The mixture should look uniformly dark and glossy.
- Whisk egg yolks and granulated sugar until pale. Pour in a steady stream of the hot coffee cream while whisking continuously.
- Return the mixture to the saucepan and cook over medium-low heat, stirring constantly, until the custard coats the back of a spoon at 175F. You should see thickened custard cling to the spoon in a smooth layer.
- Strain the custard, then stir in vanilla extract and salt. Stop when fully blended and the color is even.
- Cool the custard completely over an ice bath. Keep stirring until it feels cool to the touch.
- Refrigerate at least 4 hours. Chill until thoroughly cold throughout.
- Churn the chilled custard in an ice cream maker. Continue churning until the texture becomes soft-serve like and dense.
- Transfer to a freezer-safe container and freeze until firm. Let it sit until scoopable with clean edges.