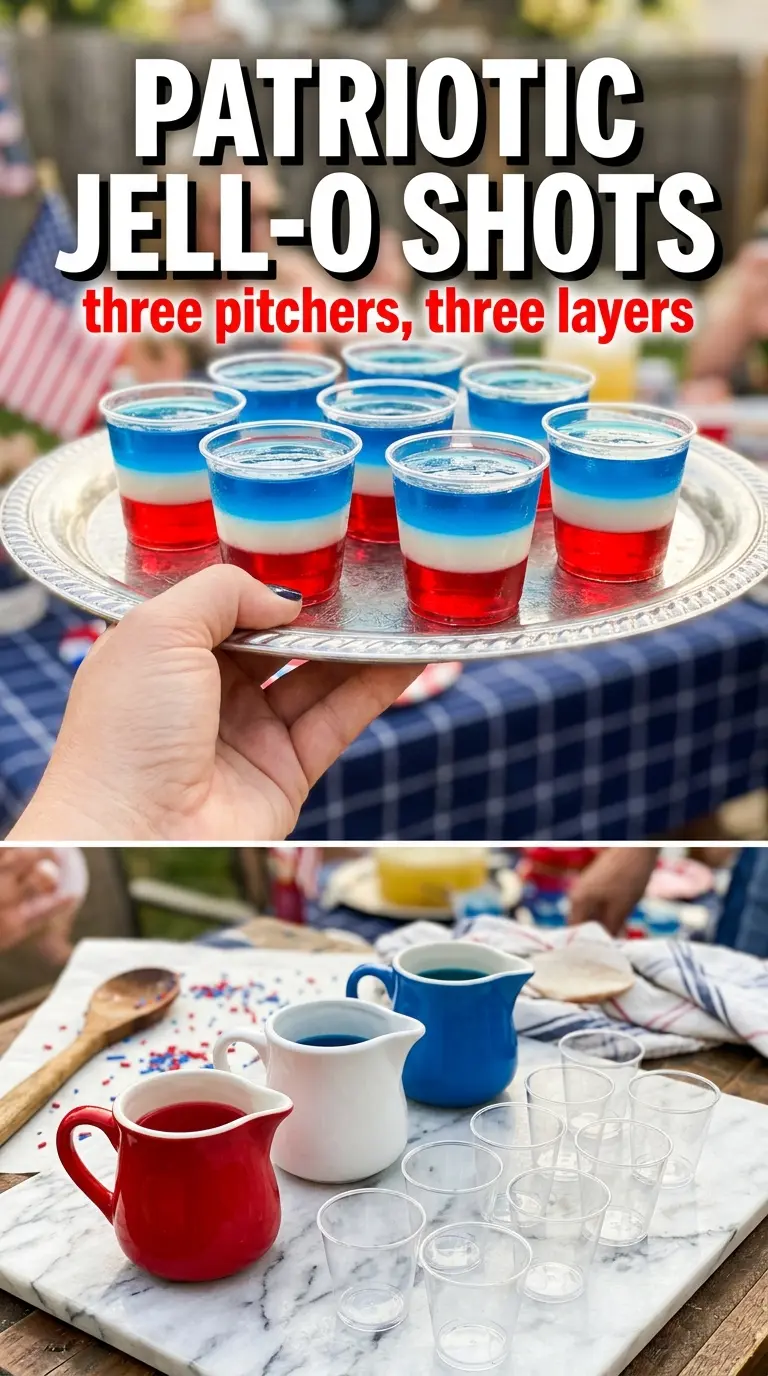
Rows of glossy red, white, and blue Jell-O shots always disappear fast because they hit the sweet spot between playful and polished. The layers stay clean, the cups look festive on a tray, and each bite gives you that cool, fruity wobble that makes people reach for a second one before they finish the first.
The trick is patience between layers. Each one needs to be set enough to support the next pour, but not so frozen that the layers don’t grip each other. The white layer does double duty here: it softens the look, and the condensed milk gives it a creamy finish that keeps the whole cup from tasting like straight candy.
Below, I’m walking through the layering order that keeps the colors sharp, plus the little timing details that keep the cups neat instead of sloshy. If you’ve ever ended up with streaked colors or a layer that floated, the process notes will save you from that.
The layers set up cleanly and the blue didn’t bleed into the white at all. I chilled each layer just like the directions said and they came out looking like little patriotic parfaits.
These red, white, and blue Jell-O shots stack beautifully when you chill each layer before adding the next one.
The Layering Window That Keeps the Colors Clean
Jell-O shots look simple until the layers start sliding into each other. The problem usually isn’t the gelatin itself. It’s adding the next layer while the one underneath is still loose enough to move. For these cups, each layer needs to be fully set on top before the next pour goes in, but still soft enough that the new layer bonds instead of sitting on top like a separate lid.
That’s why the timing matters more than rushing. The red layer should feel firm when you tilt the cup, the white layer should be opaque and set across the surface, and the blue layer needs to be cooled before it touches the cup so it doesn’t melt the layer below. If any layer is too warm, you’ll get color bleed and a cloudy edge instead of the sharp patriotic stripes you’re after.
What Each Layer Is Doing in These Jell-O Shots
- Cherry or strawberry Jell-O — This gives you the bold red base and the strongest fruit flavor of the three layers. Cherry tastes a little more candy-like, while strawberry reads softer and sweeter. Either one works, but don’t switch to a sugar-free version unless you’re comfortable with a slightly firmer, less glossy set.
- Berry blue Jell-O — Blue raspberry-style gelatin is what gives the top layer that bright, unmistakable color. It sets just like the red layer, so it’s a straight swap in technique. If you use a different blue gelatin, keep the same water and vodka ratio so the texture stays balanced.
- Unflavored gelatin — This is what gives the white layer its structure. You can’t replace it with Jell-O and get the same clean, opaque middle, because the flavor packet would tint the layer and change the final look. Blooming and dissolving it fully matters here, or you’ll end up with tiny rubbery bits in the milk mixture.
- Sweetened condensed milk — This is what makes the middle layer creamy and sweet instead of chalky. Regular milk won’t give the same body or opacity. If you want a slightly lighter finish, evaporated milk can work in a pinch, but the layer will be thinner and less rich.
- Vodka — Cold vodka keeps the flavor clean and helps the Jell-O set without adding much extra liquid sweetness. A plain, unflavored vodka is best because flavored versions can muddy the fruit layers. Keep it cold so it doesn’t slow down the setting time.
Building the Cups Without Muddying the Layers
Mixing the Fruit Layers
Dissolve the red Jell-O fully in boiling water before adding the vodka. Stir until every grain is gone and the liquid looks smooth and clear, because any undissolved powder will show up as grit in the finished shot. Once the vodka goes in, pour right away into the cups and stop at one-third full. If you overfill the first layer, the later layers won’t stack neatly.
Letting the Base Set Enough to Hold
Chill the red layer until it’s firm enough that a fingertip pressed lightly on the top won’t leave a wet dent. That usually takes about 45 minutes, but the actual cue matters more than the clock. If the surface still ripples when you move the tray, the next layer will sink and blur the line between colors.
Making the Creamy White Center
Stir the unflavored gelatin into the sweetened condensed milk and boiling water until it dissolves completely. The mixture should look smooth and uniform, with no cloudy specks. Let it cool slightly before adding the cold water, then spoon it gently over the set red layer. Pouring too fast or from too high up will punch holes in the base layer and mix the colors.
Finishing With the Blue Top
Cool the blue Jell-O mixture back to room temperature before pouring it on. Warm liquid is the fastest way to melt the white layer and ruin the clean line. Aim the stream against the side of the cup or use the back of a spoon to slow it down, then chill again until the tops are fully set and glossy.
How to Adapt These Patriotic Jell-O Shots for Different Crowds
Make Them Stronger for an Adult Party
You can replace some of the cold water in the fruit layers with more vodka, but don’t push it too far or the gelatin won’t set firmly. The safest balance is to keep enough water in the mix for the powder to dissolve properly, then use the vodka as the alcohol portion. Too much alcohol gives you soft, slippery shots that slump when you pick them up.
Alcohol-Free Version
Swap the vodka in the red and blue layers for the same amount of cold water. The cups will still set with the same layered look, but they’ll taste a little brighter and sweeter since there’s no alcohol edge. This is the version I’d use for a mixed crowd where you still want the same presentation.
Using Berry or Cherry Flavor Alternatives
Any red gelatin with a bold color works, but cherry gives the sharpest contrast against the white center. Berry blue can be swapped for another blue gelatin if needed, though the shade may shift a little. The important part is matching the liquid ratios exactly so each layer sets the same way.
Storage and Reheating
- Refrigerator: Keep covered in the fridge for up to 3 days. The surface stays neat, though the colors can start to lose a little shine after the first day.
- Freezer: Don’t freeze Jell-O shots. The texture breaks when they thaw and the layers turn watery and grainy.
- Reheating: No reheating needed. Serve them straight from the fridge, and keep them cold until the last cup is gone so the layers stay firm and glossy.
Questions I Get Asked About These Jell-O Shots
Jell-O Shots (Red, White, and Blue)
Ingredients
Equipment
Method
- Dissolve the cherry or strawberry Jell-O in 1 cup boiling water, stirring for 2 minutes until fully dissolved and glossy.
- Stir in 1/2 cup cold vodka, then pour into shot cups to about one-third full.
- Refrigerate for 45 minutes until the red layer is fully set and no longer jiggles when touched gently.
- Combine sweetened condensed milk, 1 cup boiling water, and unflavored gelatin, stirring until dissolved.
- Cool slightly, stir in 1/2 cup cold water, then spoon gently over the set red layer to avoid disturbing the surface.
- Refrigerate for another 45 minutes until the white layer is set.
- Dissolve the berry blue Jell-O in 1 cup boiling water, stirring for 2 minutes until dissolved and smooth.
- Mix in 1/2 cup cold vodka, cool to room temperature, then gently pour over the set white layer.
- Refrigerate for at least 1 hour until fully set, then serve cold.