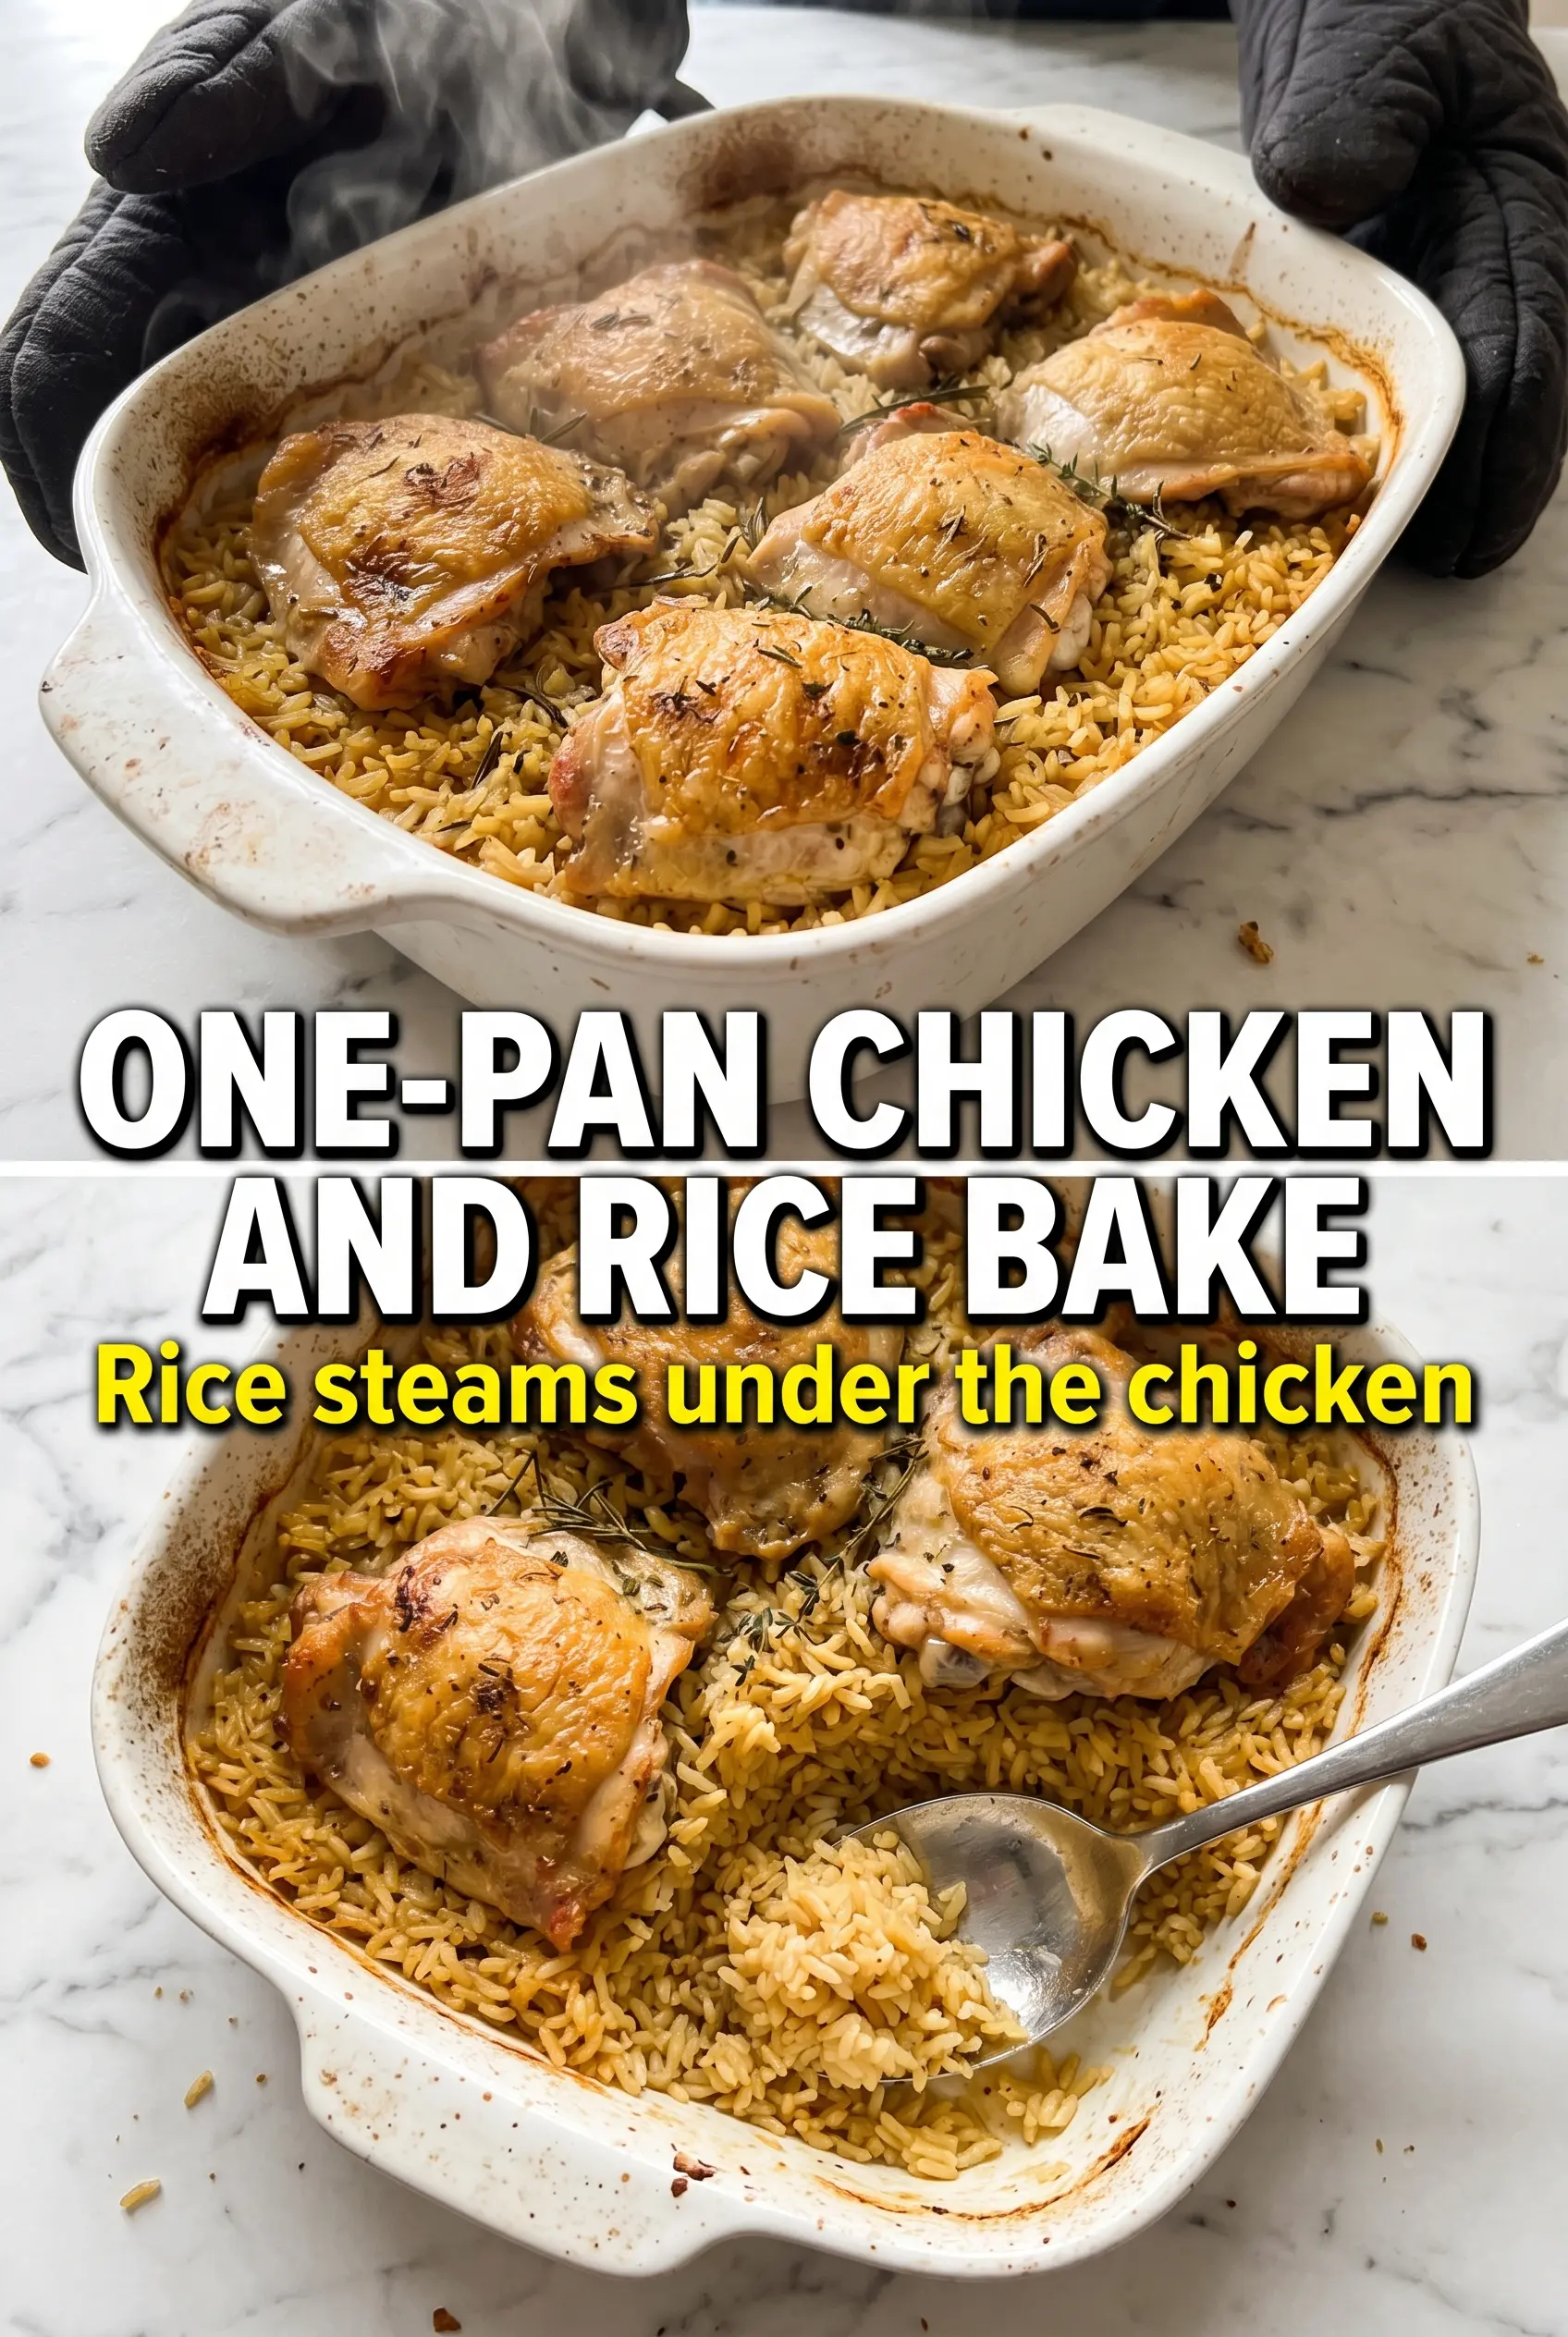
Golden-skinned chicken thighs tucked into herb-scented rice make one of those dinners that looks like it took more effort than it did. The rice cooks in the same pan as the chicken, so it pulls in every bit of seasoned drippings while the skin stays high enough above the surface to crisp instead of going soft. You get a full meal with one dish and almost no babysitting.
The part that makes this version work is the balance of liquid, heat, and placement. Long-grain white rice holds its shape and stays fluffy, bone-in skin-on thighs stay juicy through the bake, and the first covered stretch gives the rice time to absorb broth before the final uncovered finish browns the chicken skin. If the liquid ratio is off or the chicken gets buried too deeply, the rice turns mushy and the skin steams instead of roasting.
Below, I’ll walk through the small details that keep the rice tender and the chicken crisp, plus a few smart swaps if you need to adjust for what’s in the kitchen.
The rice came out fluffy instead of sticky, and the chicken skin actually crisped up after uncovering. I added a little extra thyme and the whole dish smelled incredible when I pulled it from the oven.
Save this one-pan chicken and rice bake for the nights when you want crispy chicken skin, fluffy rice, and just one dish to wash.
The trick to keeping the rice fluffy under the chicken
The biggest failure in a chicken and rice bake is usually steam. If the pan is too crowded, the chicken sits too low and the rice never gets a chance to breathe, which leaves you with soft skin and a heavy, wet texture underneath. Keeping the thighs skin-side up and leaving them nestled on top, not pushed down into the liquid, gives the rice room to cook while the skin stays exposed enough to brown at the end.
Long-grain white rice is the right choice here because it stays separate instead of clumping into a paste. The covered portion of the bake does the real work: it cooks the rice through with broth and onion while the final uncovered stretch evaporates the extra moisture and puts color on the chicken. If your rice still looks underdone when the timer ends, the pan probably needed a tighter foil seal or a few more minutes covered before the browning stage.
What each ingredient is doing in the pan
- Bone-in skin-on chicken thighs — These stay juicy through a long bake and give the rice all the flavor that comes off the skin and drippings. Boneless thighs cook faster, but they won’t season the rice the same way and they miss that crispy top.
- Long-grain white rice — This is the base that holds the whole dish together. It cooks up fluffy and separate in broth; short-grain rice turns softer and can get sticky in a casserole like this.
- Chicken broth — Broth carries the savory flavor into the rice. Low-sodium works best so you can season the pan yourself, since the chicken and broth both bring salt to the party.
- Onion and garlic — They melt into the rice as it bakes and give the whole dish a deeper, more cooked-all-day taste. Fresh garlic matters more than jarred here because it perfumes the rice without tasting flat.
- Thyme and Italian seasoning — These herbs make the rice taste like it belongs under roast chicken instead of tasting like plain grains. Dried herbs work well because they have time to bloom in the hot broth.
- Olive oil — The drizzle on top helps the chicken skin brown once the foil comes off. You only need enough to coat the skin lightly; too much can make the top greasy instead of crisp.
- Fresh parsley — This finishes the dish with color and a clean, fresh note. It’s not just garnish; it keeps the final pan from tasting heavy.
Building the bake so the rice cooks before the chicken dries out
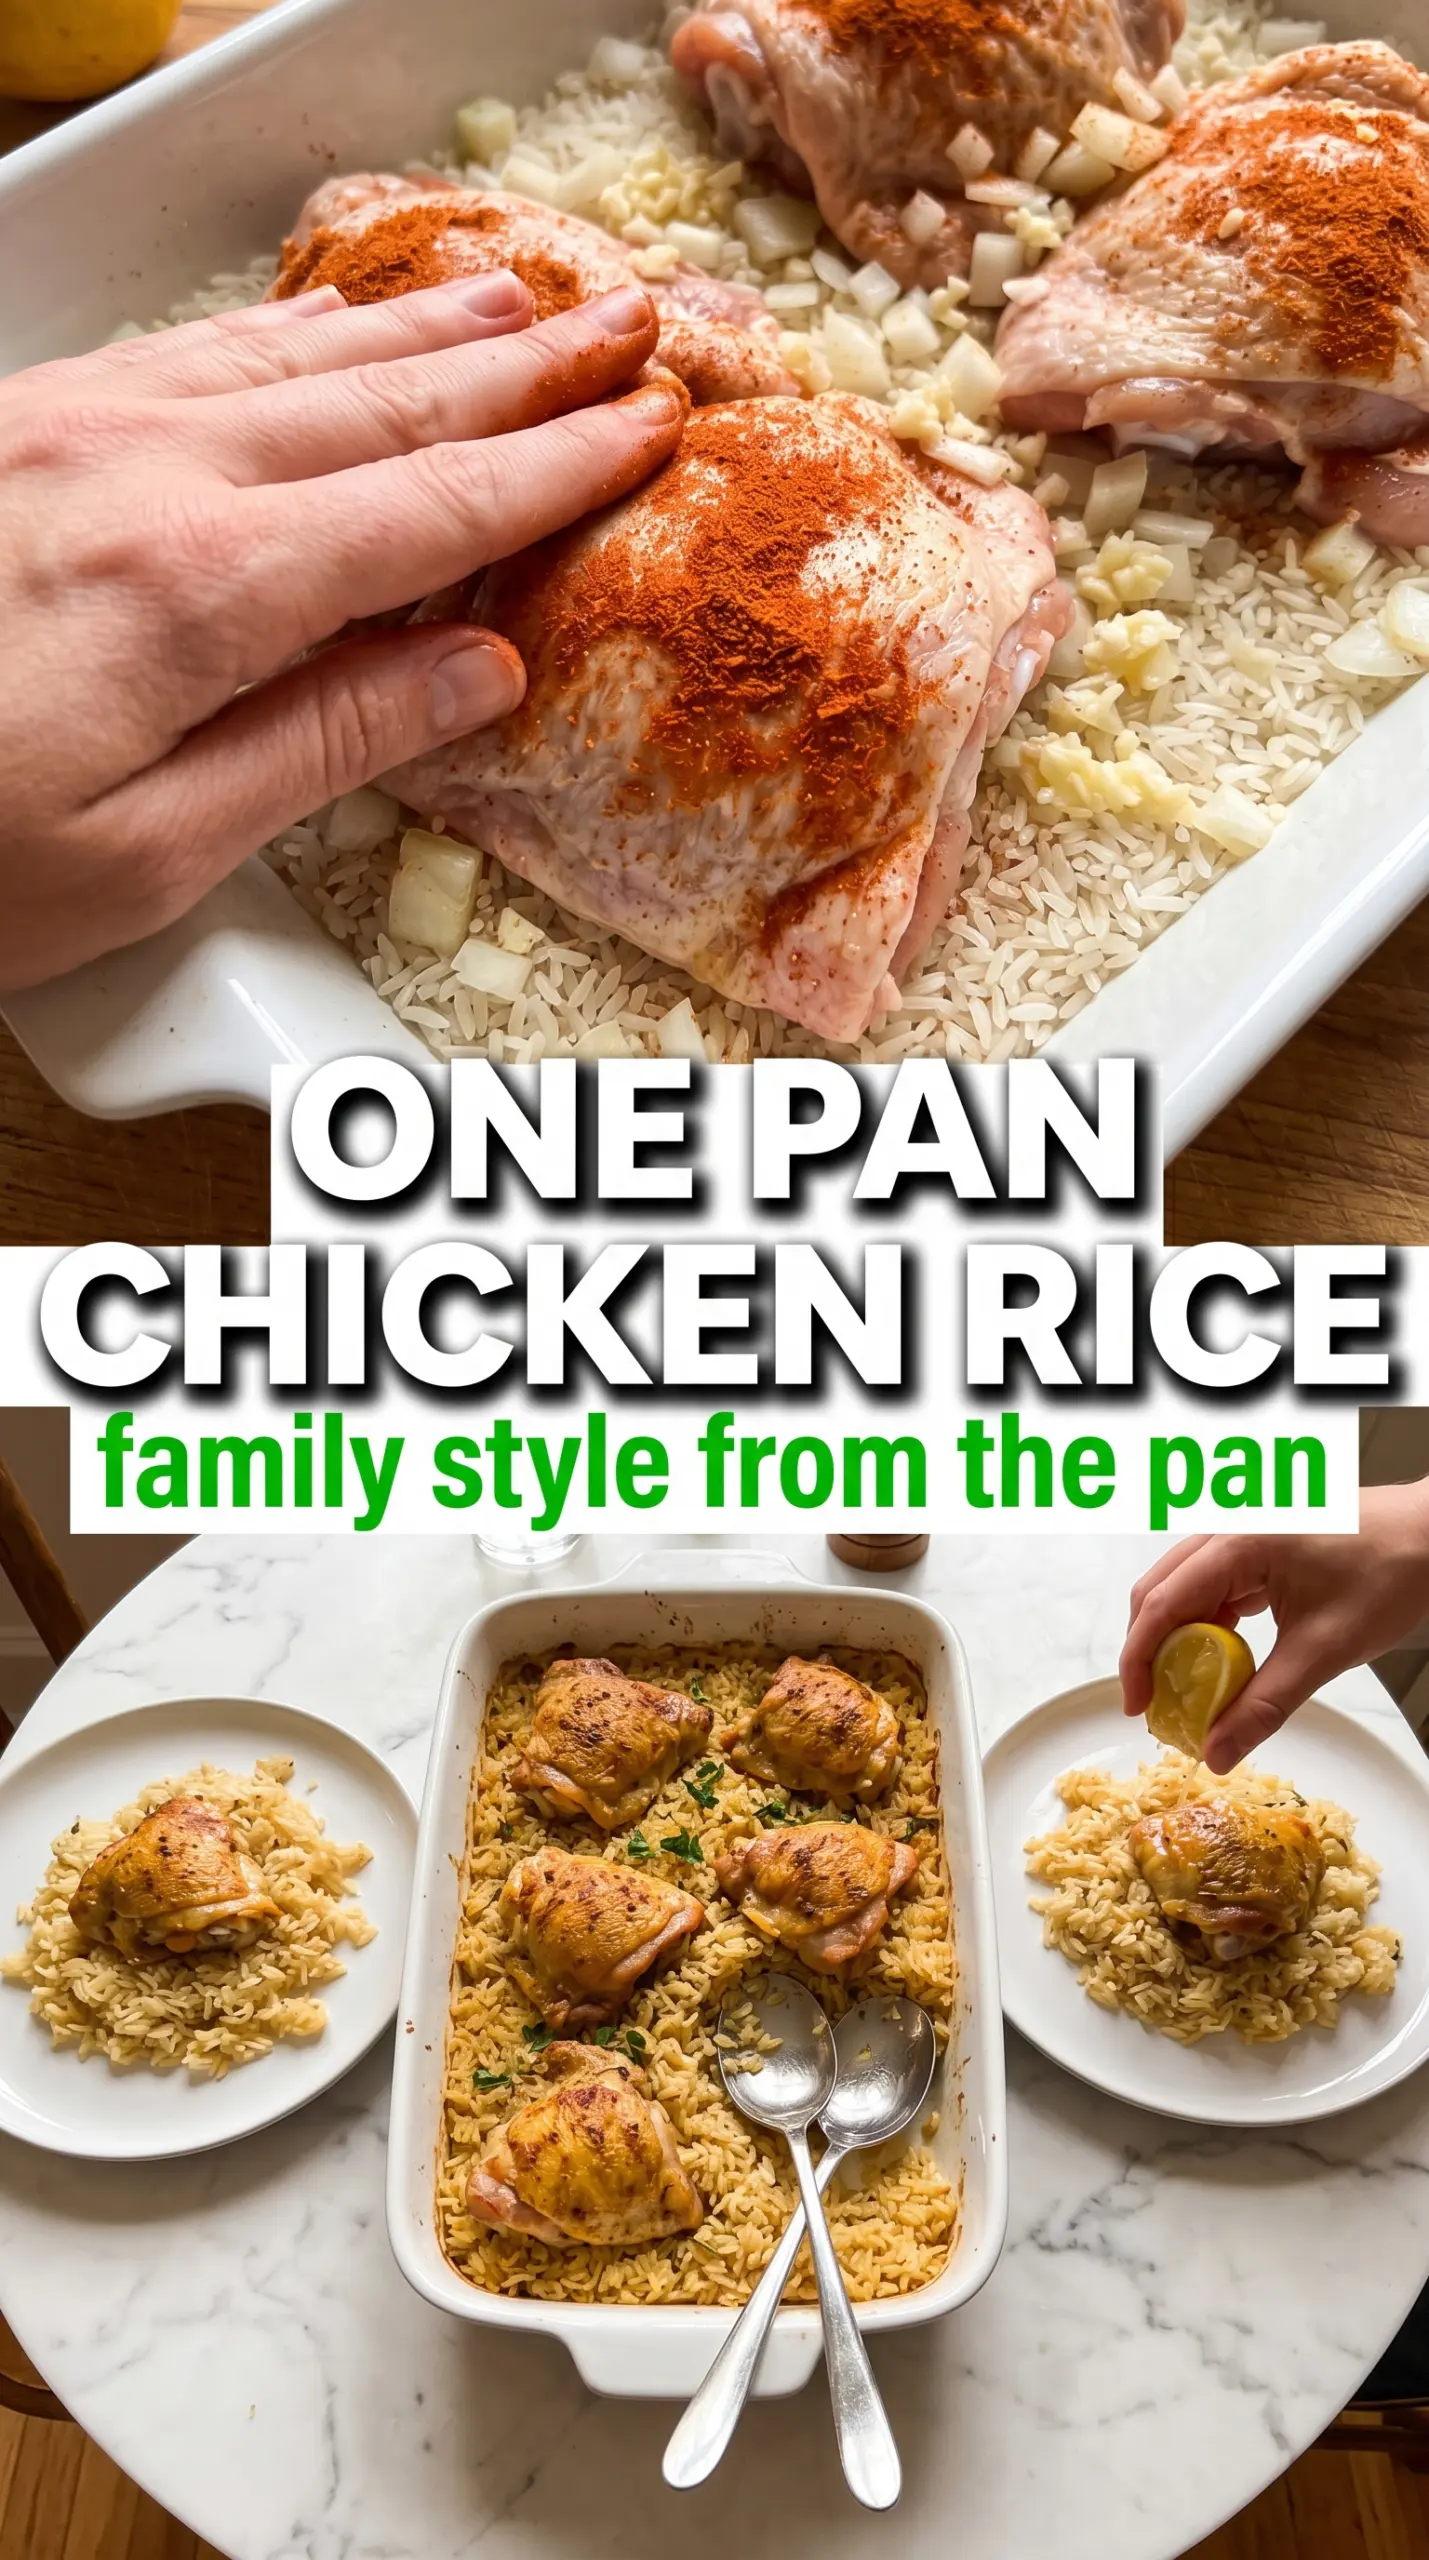
Season the chicken before it hits the pan
Season both sides of the thighs generously with salt, pepper, garlic powder, paprika, and Italian seasoning. The chicken is doing double duty here: it needs to taste good on its own and also season the rice beneath it as it bakes. If the seasoning looks light before it goes into the oven, it’ll taste light on the plate.
Mix the rice base right in the baking dish
Stir the uncooked rice, broth, onion, garlic, thyme, Italian seasoning, and salt directly in a 9×13 dish. That gives the rice an even start and keeps you from dirtying another pan. The liquid should look evenly distributed, with no dry pockets around the edges; if you see dry grains, they won’t cook at the same rate.
Nestle the chicken on top, not underneath
Lay the thighs skin-side up across the rice mixture and drizzle them with olive oil. Don’t bury them in the liquid or flip them skin-side down, because then the skin steams and the rice gets weighted down. You want the chicken perched on the surface so the rendered fat can drip down while the skin stays exposed.
Cover, then uncover for the finish
Bake tightly covered at 375°F for 40 minutes, then remove the foil and bake about 15 minutes more. The covered stage is for steam and tenderness; the uncovered stage is for evaporation and browning. If the rice still has excess liquid when the chicken is done, give it another few minutes uncovered rather than cranking the heat, which can dry out the top before the center catches up.
How to adapt this one-pan chicken and rice bake without losing the texture
Swap in chicken breasts for a leaner pan
You can use bone-in skin-on chicken breasts, but they usually need a little less time than thighs and can dry out if overbaked. Start checking early during the uncovered stage and pull them as soon as the thickest part reaches temperature. The rice will still cook the same way, but thighs give you more forgiveness and a richer pan flavor.
Make it dairy-free without changing a thing
This recipe is naturally dairy-free as written, which makes it an easy option when you need a dinner that works for a lot of tables. Keep the broth and seasoning simple and the texture stays exactly the same. The only thing to watch is the broth label, since some versions sneak in dairy or cream flavoring.
Use brown rice only if you’re ready to extend the bake
Brown rice needs more liquid and a much longer cooking time, so it won’t fit this exact timing without changes. If you swap it in, add more broth and expect the chicken to spend longer covered before the skin can brown. The payoff is a nuttier texture, but the dish won’t have the same quick one-pan rhythm.
Add vegetables that can handle the oven
Peas, chopped carrots, or small broccoli florets can be stirred into the rice near the end of the covered bake or scattered around the chicken if they’re cut small. Heartier vegetables like mushrooms can go in at the start, but watery vegetables can throw off the rice ratio. The goal is to add enough color without flooding the pan.
Storage and Reheating
- Refrigerator: Store covered for up to 4 days. The rice will firm up a little as it chills, but the flavor holds well.
- Freezer: This freezes better than a lot of rice casseroles. Cool it completely, portion it into airtight containers, and freeze for up to 2 months.
- Reheating: Reheat covered in a 325°F oven with a splash of broth to loosen the rice. The most common mistake is microwaving it dry, which makes the rice chalky and the chicken rubbery.
Questions I Get Asked About This Recipe
One-Pan Chicken and Rice Bake
Ingredients
Equipment
Method
- Preheat oven to 375°F. Heat the oven until it fully reaches temperature so the rice starts cooking immediately.
- Mix long-grain white rice, chicken broth, diced medium onion, minced garlic, dried thyme, dried Italian seasoning, and salt in a 9x13 baking dish; stir to combine. Aim for an even layer so the rice cooks uniformly.
- Season bone-in skin-on chicken thighs generously on all sides with pepper, garlic powder, paprika, and Italian seasoning. Keep the skin well coated for crisping as it bakes.
- Nestle the chicken skin-side up on top of the rice mixture; drizzle with olive oil. Leave most of the skin exposed to the oven air for a golden, crisp finish.
- Cover tightly with foil and bake 40 minutes at 375°F. You should see bubbling around the edges of the rice as it absorbs the broth.
- Remove the foil and bake another 15 minutes at 375°F. The chicken skin should turn golden and the rice should absorb all liquid.
- Garnish with fresh parsley and serve from the baking dish. The rice should be fluffy with herb-flecked edges and the chicken skin crisp above the surface.