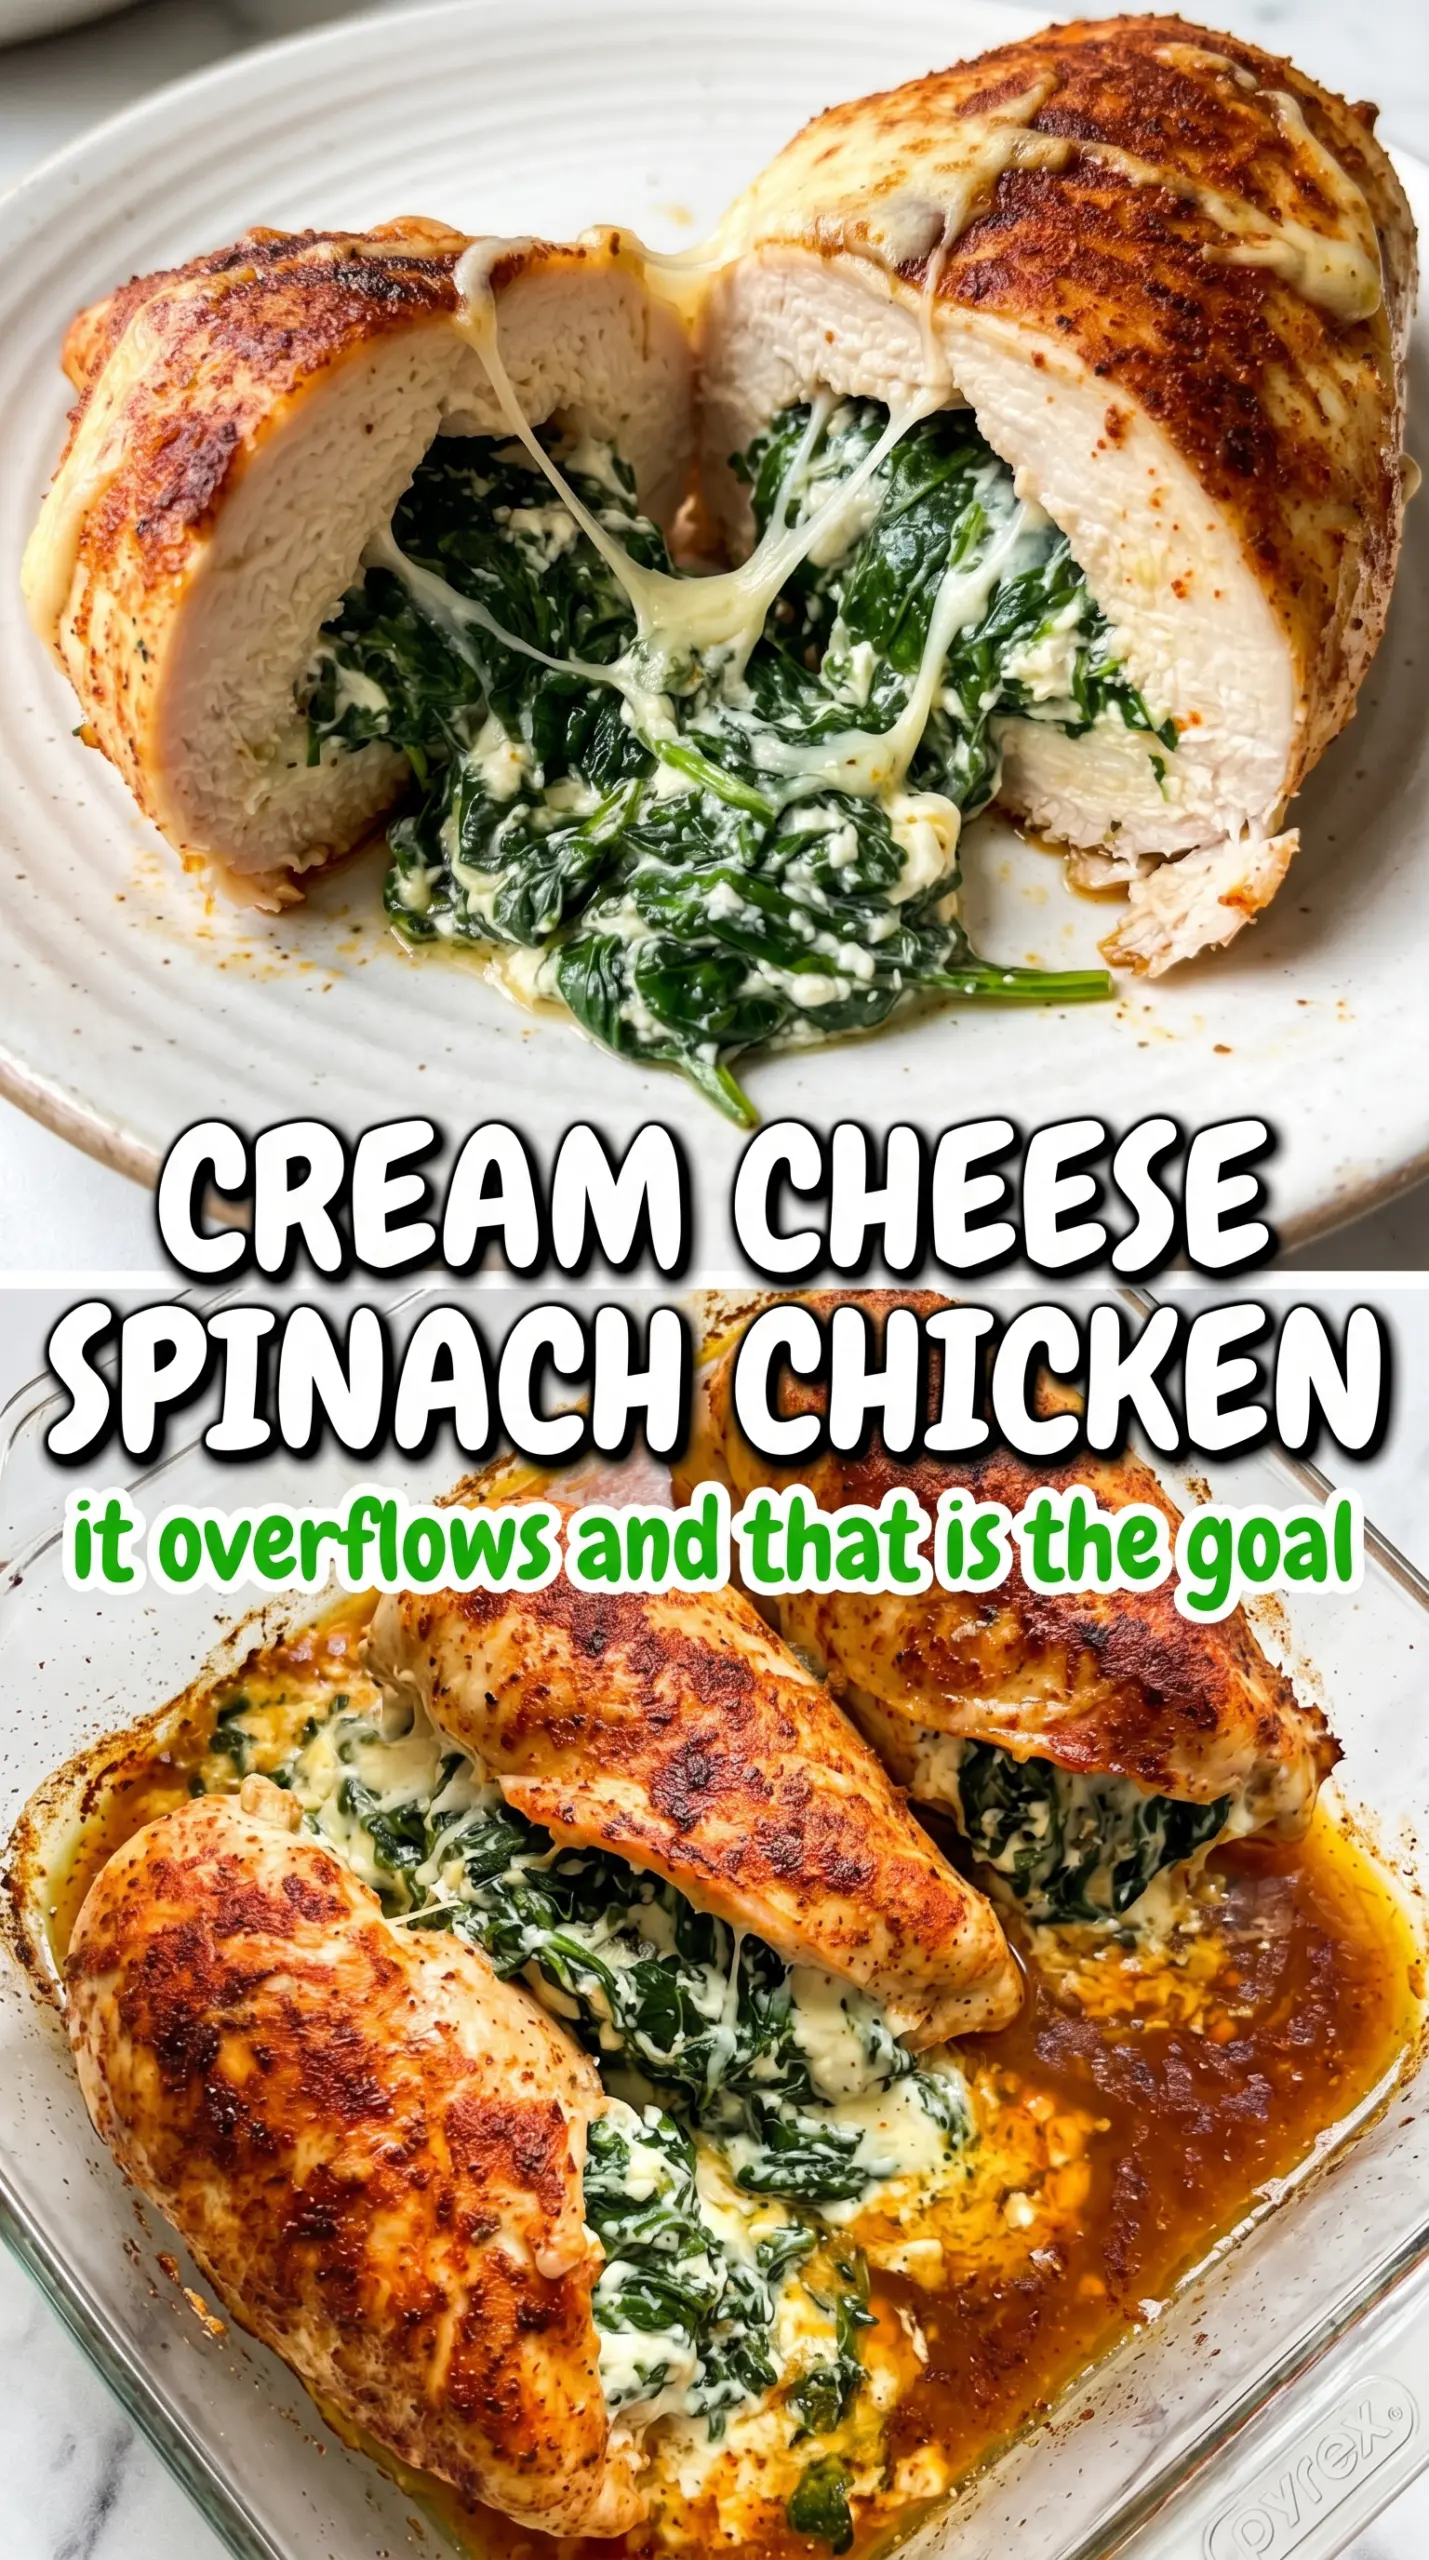
Golden seared chicken breasts with a creamy spinach filling hit that sweet spot between weeknight practical and dinner-party worthy. The outside gets a seasoned crust that holds its shape, and when you slice in, the center turns soft and rich with melted mozzarella, garlic, and little pops of sun-dried tomato. It looks like more work than it is, which is always a nice bonus.
What makes this version dependable is the way the filling is built. Softened cream cheese carries the spinach and keeps everything creamy without turning watery, while the mozzarella gives you that stretchy, molten middle once the chicken comes out of the oven. Searing first matters here, because it gives the breast color and flavor before the oven finishes the job, and it helps the stuffing stay tucked inside instead of leaking out right away.
The details below cover the part that usually trips people up: how to cut the pocket deep enough without slicing through, how to keep the filling from escaping, and how to know when the chicken is done without drying it out.
The filling stayed creamy and didn't leak everywhere, and the chicken was still juicy after the oven time. I loved the sun-dried tomatoes with the spinach. My husband cut into one piece and asked if there was more left.
Save these spinach stuffed chicken breasts for the night you want a creamy center, a crisp golden sear, and a dinner that slices open beautifully.
The Pocket Matters More Than the Stuffing
The biggest mistake with stuffed chicken is cutting a slit that looks generous from the outside but leaves you nowhere to hide the filling. You want a deep pocket with a thick border at the bottom and the far edge intact, so the chicken can seal around the stuffing as it cooks. If you cut through, the filling has a direct path out and the sear won't save it.
Even distribution matters too. A packed pocket that's overfilled will burst before the center reaches temperature, while a lightly filled breast stays intact and slices neatly. The goal is enough filling to show at the cut edge without forcing the meat apart.
- Chicken breasts — Choose similar-sized breasts so they cook at the same pace. If one is much thicker, pound it lightly on the thick end before cutting the pocket.
- Cream cheese — This is the binder that keeps the filling creamy and stable. Full-fat cream cheese works best because it stays rich and doesn't turn loose in the oven.
- Baby spinach — Chop it fine so it folds into the filling without long strands pulling out when you slice the chicken. Don't use wet spinach straight from rinsing; dry it well first or the filling gets thin.
- Sun-dried tomatoes — These bring sweetness and acidity that keep the filling from tasting flat. Oil-packed tomatoes work fine; just blot them before chopping so the filling doesn't get greasy.
- Mozzarella — It gives you the melty stretch that makes the middle look as good as it tastes. Pre-shredded is fine here, though freshly shredded melts a little smoother.
What Each Ingredient Is Actually Doing in This Recipe
- Primary ingredient (the star) — Quality matters most. Choose the best you can find.
- Cooking medium (oil, butter, or broth) — This carries flavors and prevents dryness.
- Seasonings (salt, pepper, spices, herbs) — Layer flavors so nothing overpowers. Build depth gradually.
- Aromatics (garlic, onion, herbs) — Cook with fat to bloom flavors. Become the foundation.
- Supporting ingredients — Complement the main ingredient without overpowering it.
- Sauce or liquid (if applicable) — Brings flavors together. Balance richness with acid.
- Acid (lemon, vinegar, wine, or other) — Brightens and prevents flat-tasting results.
- Final finish (garnish, glaze, or sauce) — Prevents one-dimensional taste and adds visual appeal.
Getting the Sear and Bake to Work Together
Mix the Filling First
Stir the softened cream cheese, spinach, mozzarella, sun-dried tomatoes, garlic, Italian seasoning, salt, and pepper until the mixture looks evenly speckled and holds together when you scoop it. If the cream cheese is still stiff, the filling won't blend cleanly and you'll end up tearing the chicken more while stuffing. Soft cream cheese should give easily under the spoon.
Cut, Fill, and Secure the Breasts
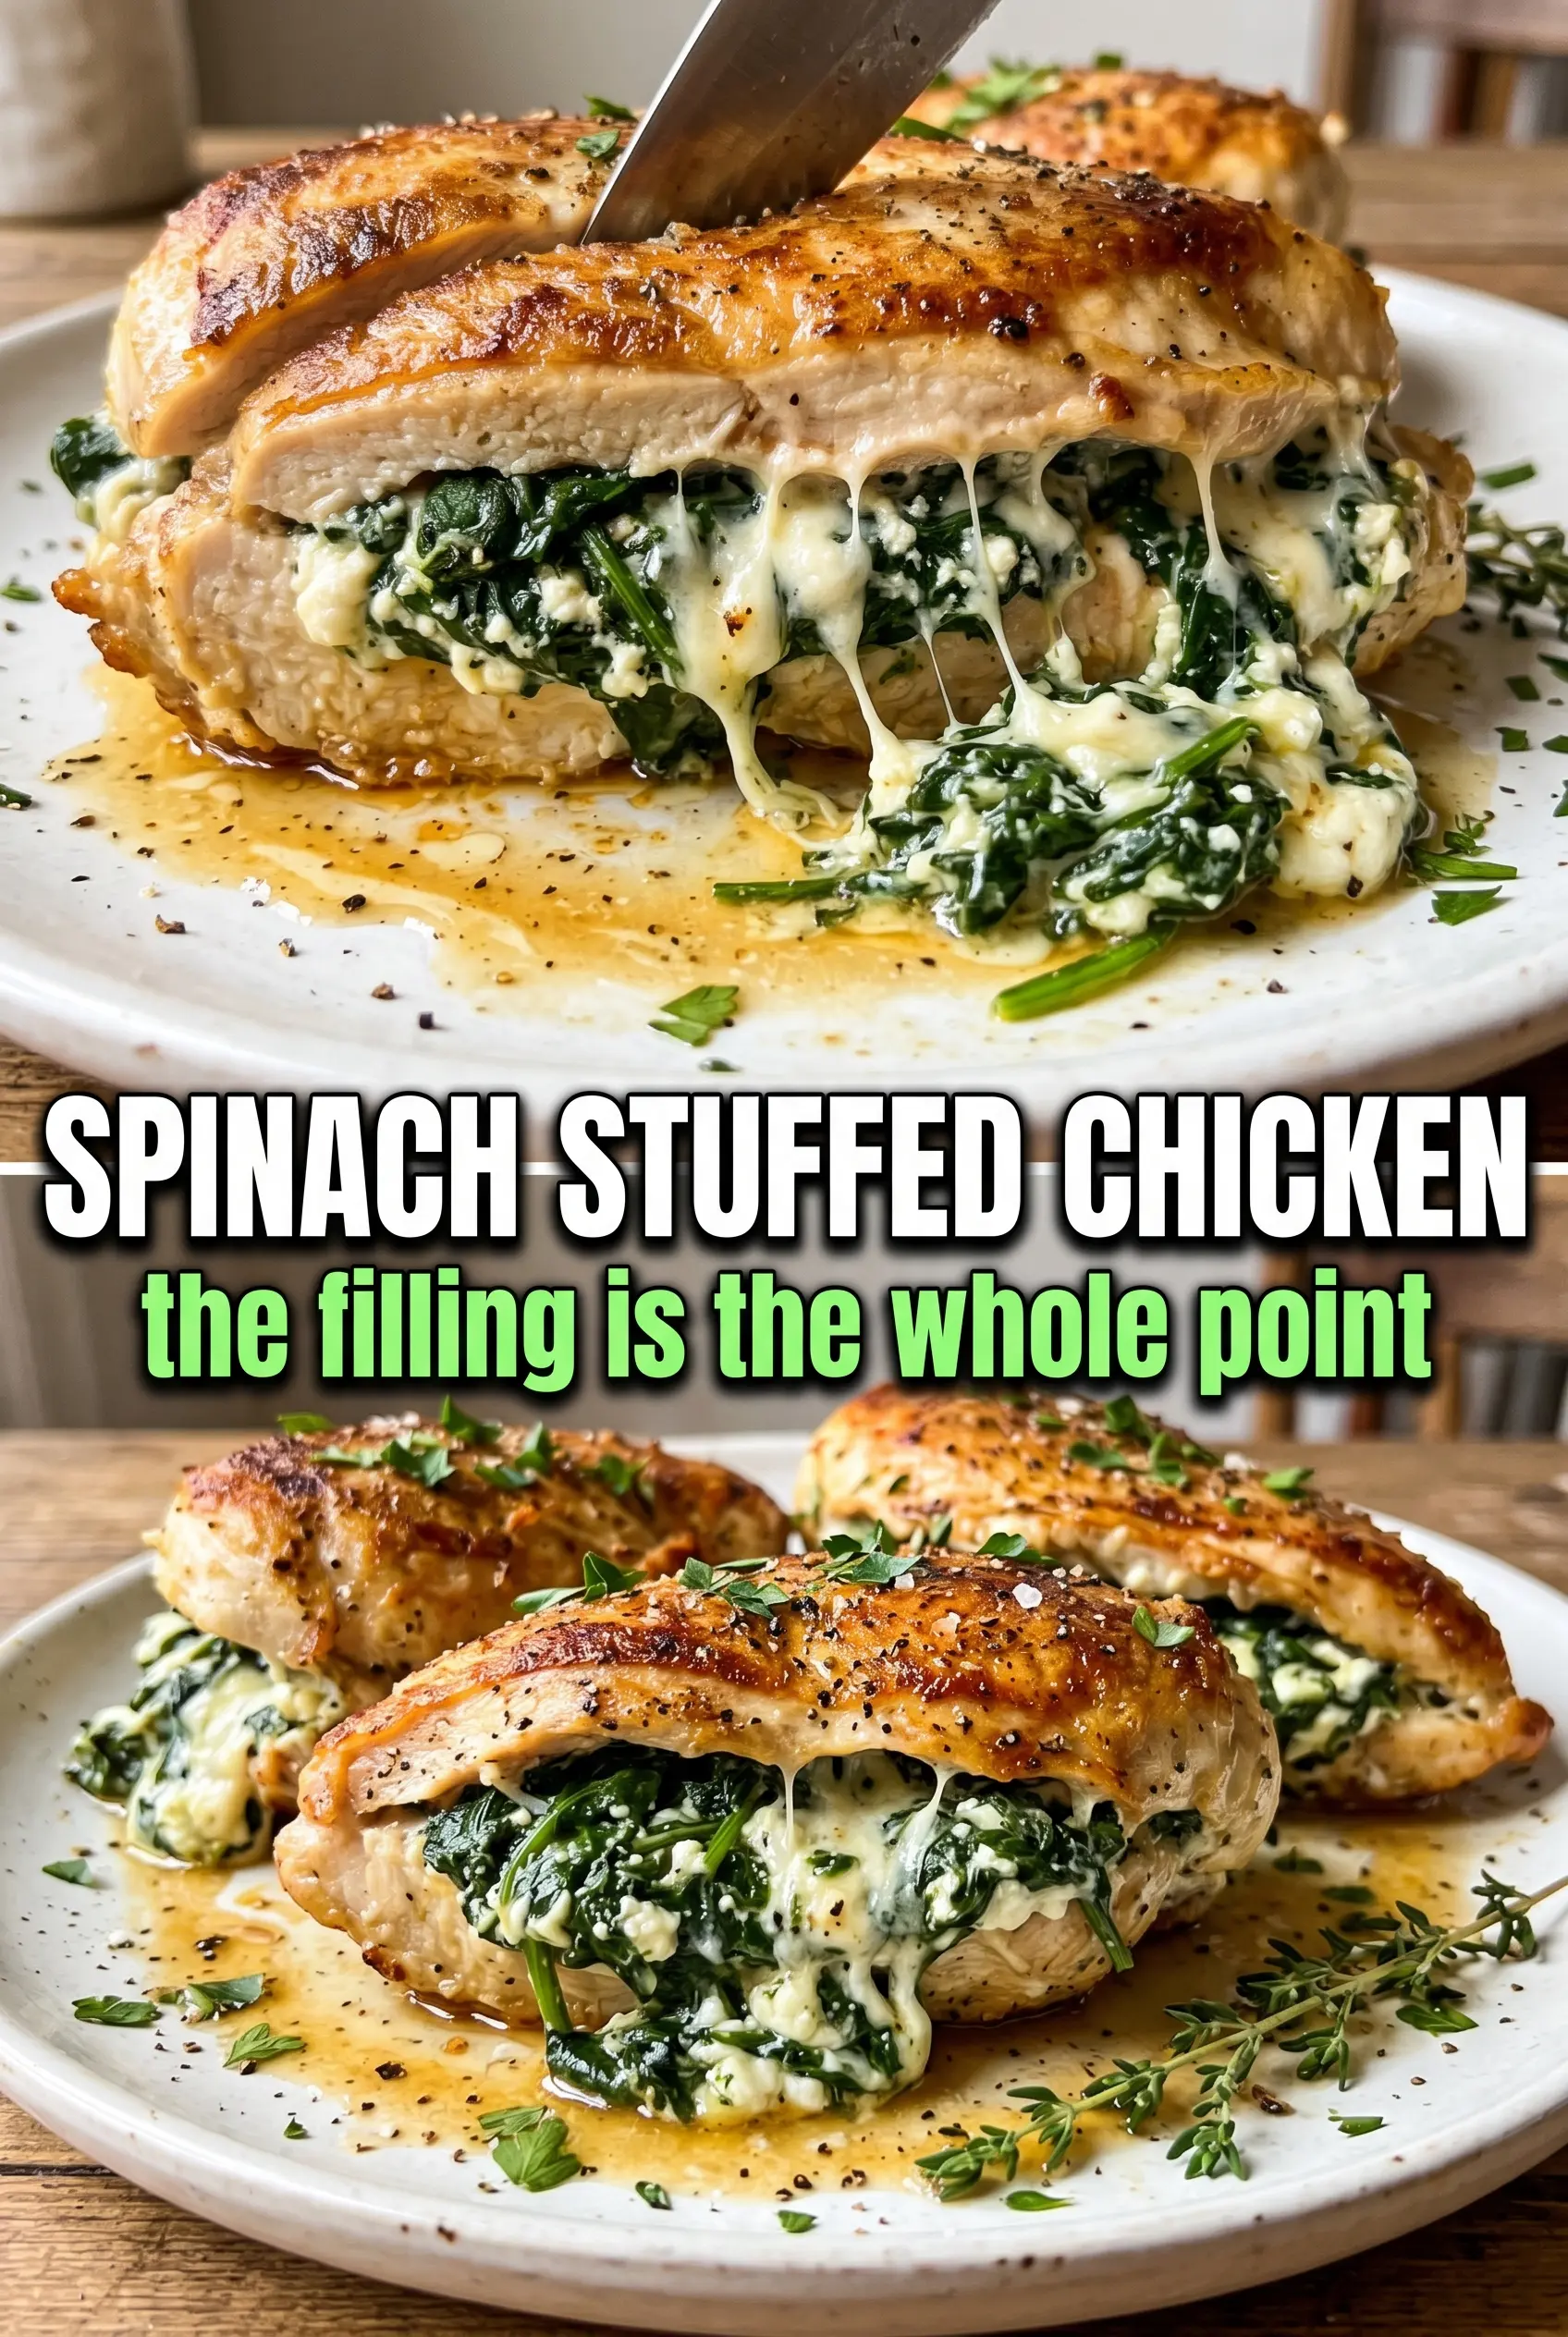
Slide a sharp knife horizontally into the thickest side of each breast and work carefully toward the center, stopping before you cut through the opposite edge. Spoon in the filling without packing it so hard that the meat splits, then close the opening as much as it will naturally allow. Two or three toothpicks usually hold it; if you need more than that, the pocket is probably too full.
Sear for Color Before the Oven Takes Over
Heat the oil in an oven-safe skillet until it shimmers, then lay in the stuffed chicken and leave it alone long enough for a deep golden crust to form. If you move it too early, the surface sticks and tears instead of browning cleanly. You're looking for color, not doneness, because the oven finishes the center.
Finish in the Oven and Rest Before Slicing
Transfer the skillet to the oven and bake until the thickest part of the chicken reaches 165°F. Pull it out and let it rest for five minutes before removing the toothpicks and slicing; that short rest keeps the juices from flooding out the moment you cut in. If the chicken looks done but still feels bouncy and under-set in the center, give it another few minutes rather than slicing early.
How to Adapt These Stuffed Chicken Breasts Without Losing the Creamy Center
Dairy-Free Version
Use a dairy-free cream cheese and a good melting plant-based cheese, then keep the filling a little thicker than usual. Some substitutes loosen more in the oven, so a firm mixture helps the chicken hold its shape and keeps the stuffing from running out.
Mozzarella Swap for a Sharper Finish
Swap part or all of the mozzarella for provolone or fontina if you want a deeper, more savory melt. The filling will taste a little less stretchy and a little more grown-up, but it still stays creamy and sliceable.
Gluten-Free by Default
This recipe is already gluten-free as written, so the main job is checking the seasoning blend and sun-dried tomatoes if you buy them prepackaged. Some spice mixes add fillers, and that's where gluten sneaks in.
Make It a Little Lighter
You can use reduced-fat cream cheese, but expect a slightly less lush filling and a little more chance of softness after baking. If you go that route, don't overload the pocket and let the chicken rest before slicing so the filling has time to set.
Storage and Reheating
- Refrigerator: Store leftovers in an airtight container for up to 3 days. The filling firms up when chilled, but the chicken stays tender if you don't overcook it in the first place.
- Freezer: Freeze cooked stuffed chicken tightly wrapped for up to 2 months. Thaw it in the refrigerator overnight; freezing is workable, though the cream cheese filling can turn a little less silky after reheating.
- Reheating: Rewarm covered in a 300°F oven until heated through, or use short bursts in the microwave at medium power. High heat dries out the chicken before the center is warm.
Answers to the Questions Worth Asking
Spinach Stuffed Chicken Breasts
Ingredients
Equipment
Method
- Preheat the oven to 400°F. Beat together cream cheese, spinach, mozzarella, sun-dried tomatoes, garlic, Italian seasoning, salt, and pepper until combined, with no dry pockets in the mixture.
- Cut a deep horizontal pocket in each chicken breast, being careful not to cut all the way through. Season inside and out generously with salt, pepper, garlic powder, Italian seasoning, and smoked paprika.
- Spoon the filling into each chicken pocket. Secure each breast with 2-3 toothpicks so the filling stays in place during searing and baking.
- Heat olive oil in an oven-safe skillet over medium-high heat. Sear the stuffed chicken for 3-4 minutes per side until golden, watching for a deep brown crust at the edges.
- Transfer the skillet to the oven and bake for 18-22 minutes until the internal temperature reaches 165°F. When done, the juices should run clear and the chicken should feel firm to the touch.
- Remove the toothpicks, rest 5 minutes, then slice and serve. The filling should be molten and glistening right after slicing, with a caramelized exterior.