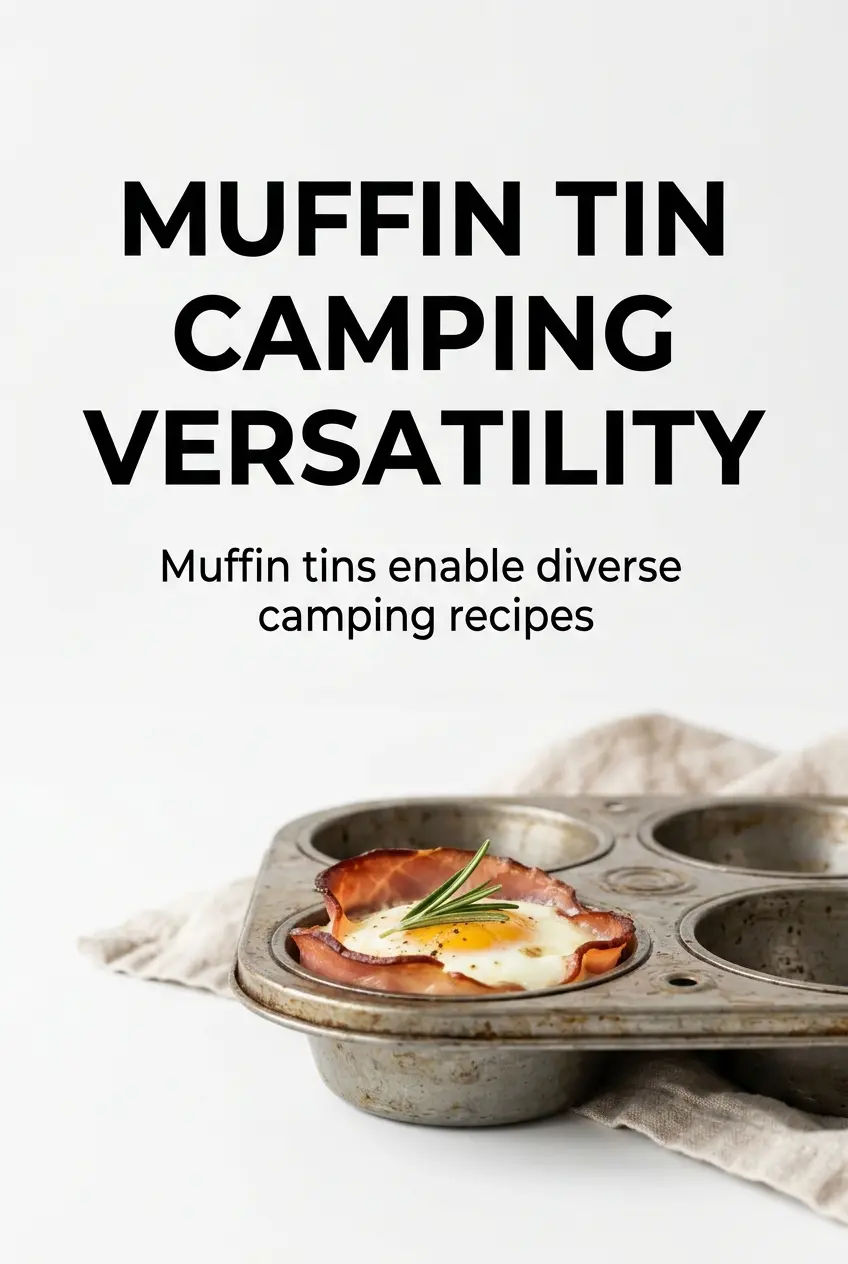
Golden baked egg cups with ham and cheese are the kind of campfire breakfast that disappears fast. The ham turns crisp at the edges while the egg stays tender, and the whole thing lifts out of the muffin tin in neat little portions that feel just a bit more special than a skillet scramble. You get salty ham, melted cheddar, soft-set egg, and a little pop from the peppers and onions all in one bite.
What makes this version work is the ham lining. It acts like a built-in cup, so the egg cooks evenly without leaking into the tin, and it gives you enough structure to serve these straight from the grate. Using a metal muffin tin matters here because it handles direct campfire heat better than flimsy pans, and covering the tin with foil traps enough heat to set the tops without drying out the yolks. Dice the vegetables fine so they soften before the eggs finish cooking.
Below, I’ve included the small details that keep the eggs from overcooking over an open flame, plus a few easy swaps if you need to work with what’s already in the cooler.
The ham held the eggs perfectly and the cheese melted right into the tops. I cooked them over the grate for about 19 minutes, and they popped out clean with no sticking at all.
Save these campfire egg cups with ham for a hands-off breakfast that comes out puffed, golden, and easy to serve straight from the muffin tin.
The Trick to Keeping Campfire Eggs Set, Not Rubberized
The biggest mistake with egg cups over a campfire is chasing heat instead of managing it. Too much flame from below cooks the bottoms before the centers have a chance to set, which leaves you with brown, tough eggs and still-loose tops. Medium heat on a grate, plus foil over the tin, gives you gentler all-around heat that behaves more like an oven.
The other thing that matters is the ham. It needs to fit snugly against the sides of the muffin cup so the egg stays contained and doesn’t run under the meat. If a slice of ham is thin and floppy, overlap two slices slightly. That little bit of extra structure keeps the cups neat and helps the bottoms release cleanly.
What the Ham, Cheese, and Vegetables Are Each Doing Here
- Deli ham — This is the cup and the seasoning all at once. A standard sandwich slice works best because it bends without tearing, but if your slices are extra thin, use two layered together so the egg doesn’t leak through. Ham from a smoked deli counter adds a little more depth, but any good-quality deli ham will work.
- Cheddar cheese — Cheddar melts into the eggs and helps hold the tops together once the cups come off the heat. Freshly shredded cheese melts more evenly than bagged shreds, which often have anti-caking agents that slow things down a little. If you want a sharper finish, use sharp cheddar; if you want a softer, creamier melt, use mild.
- Bell peppers and onions — These need to be diced very fine so they soften in the same time it takes the eggs to set. Bigger pieces stay crunchy and can throw off the texture of each bite. If you’re using leftover cooked vegetables, drain off any moisture first so the egg cups don’t turn watery.
- Cooking spray — This matters more than it sounds. The ham helps, but a lightly coated metal tin keeps the edges from sticking, especially around the cheese. Oil works too, but spray gives the thinnest, most even layer.
Building the Cups So the Eggs Cook Evenly
Line the Tin with Ham First
Spray the muffin tin before anything else, then press one slice of ham into each cup so it forms a deep little nest. The ham should come up the sides without bunching too much at the bottom, because thick folds can keep the egg from sitting level. If the slices are especially large, trim the overhang a bit rather than cramming them in.
Add the Egg Before the Toppings
Crack one egg into each ham cup before adding the cheese and vegetables. That order helps the egg settle into the shape of the cup and keeps the toppings from getting lost in the whites. If one yolk breaks, don’t panic; the cup will still cook up fine, just a little less tidy.
Cover and Cook Over Gentle Heat
Set the tin on the campfire grate over medium heat and cover it loosely with foil. You want steady heat, not a roaring fire licking the bottom of the pan. Check at the 18-minute mark; the eggs are done when the whites are set and the centers no longer look wet. If the tops are cooking faster than the bottoms, shift the tin slightly farther from the hottest part of the grate.
Lift Out Before They Overcook
Remove the tin as soon as the eggs are set, because they’ll keep cooking from residual heat. Use a small spatula or spoon to lift each cup out gently; if you wait too long, the ham can tighten against the tin and make release harder. Serve them warm while the cheese is still soft.
How to Change These Egg Cups for Different Coolers and Campsites
Swap the cheddar for what you already packed
Monterey Jack, pepper jack, or Swiss all melt nicely here. Pepper jack gives the cups a little heat, while Swiss brings a milder, nuttier finish. Use the same amount, and shred it yourself if you can for the smoothest melt.
Make them vegetarian without losing the cup shape
Swap the ham for thin slices of roasted bell pepper or par-cooked zucchini ribbons pressed into the muffin tin. You’ll lose the salty, smoky edge that ham brings, so add a little extra salt and consider a pinch of smoked paprika. The texture will be softer, but the eggs still bake up neatly.
Use bacon instead of ham for a crispier bite
Partially cook the bacon first, then line the cups with it so it finishes cooking with the eggs. Raw bacon won’t get done in the same time, and fully crisp bacon can crack when you shape it. This version tastes a little smokier and gives you more crunch around the edges.
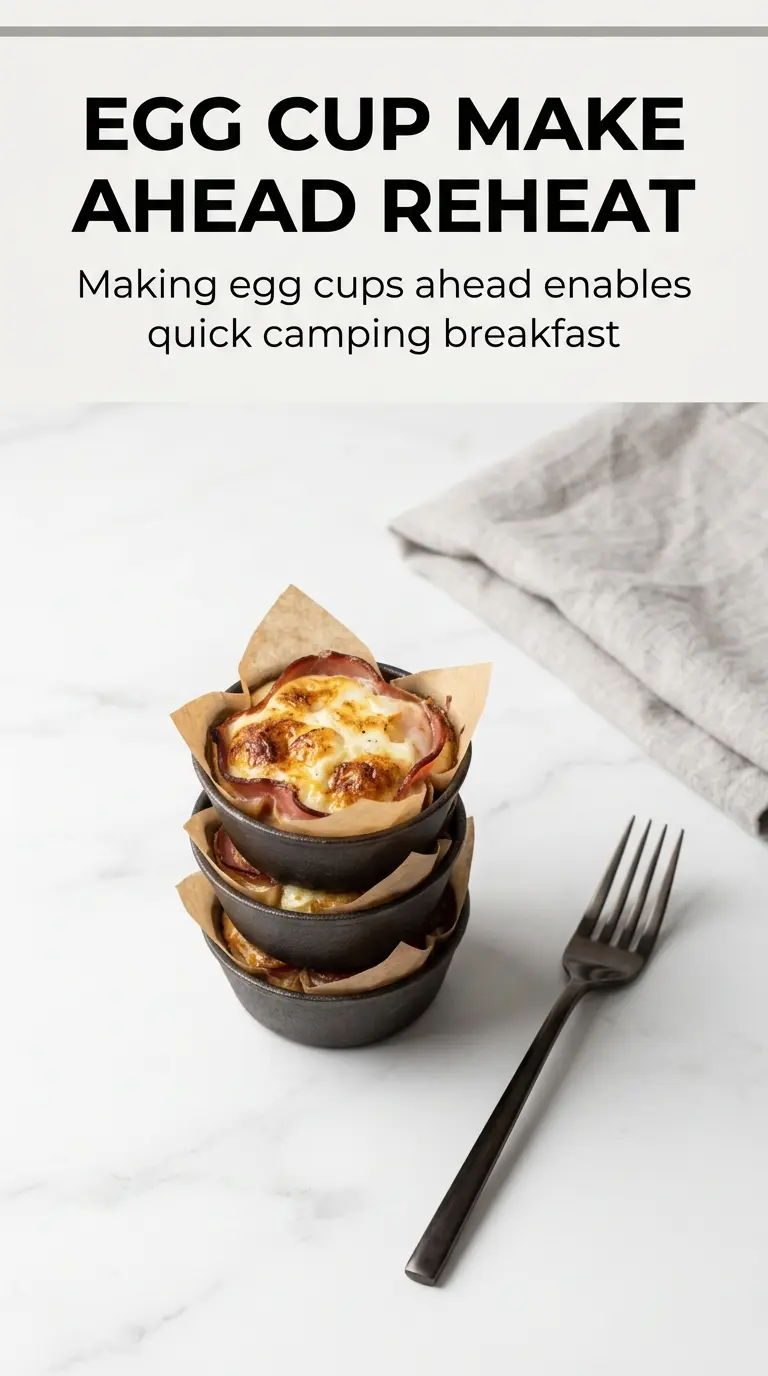
Storage and Reheating
- Refrigerator: Store leftovers in an airtight container for up to 3 days. The eggs will firm up a little after chilling, but they still reheat well.
- Freezer: These freeze better than a lot of egg dishes, but the texture of the whites gets a little less tender after thawing. Wrap individually and freeze up to 1 month for the best result.
- Reheating: Warm in a low oven or over gentle indirect heat until heated through. Don’t blast them over high flame, or the eggs tighten fast and turn rubbery before the center is hot.
Answers to the Questions Worth Asking
Campfire Egg Cups with Ham
Ingredients
Equipment
Method
- Spray a metal muffin tin with cooking spray so the ham releases easily. Use a light, even coating and make sure every cup is covered.
- Line each cup with a slice of deli ham, pressing lightly to form a cup shape. Trim or overlap as needed so the base and sides are covered.
- Crack one egg into each ham cup. Keep the yolk intact and distribute eggs evenly across all 12 cups.
- Top each cup with shredded cheddar cheese, bell peppers, and onions, then season with salt and pepper. Aim for even coverage so the centers set uniformly.
- Place the muffin tin on a campfire grate over medium heat. Keep it stable over the coals and maintain steady medium heat.
- Cover the tin with aluminum foil and cook for 18-20 minutes until the eggs are set. The tops should look puffed and golden with no runny center.
- Carefully remove the egg cups and serve warm. Let them cool just 1-2 minutes so they release without tearing.